Login & Logout Navigation Menu LinksNew
Add smart login, logout, register, and account links to any WordPress classic menu. Each link automatically shows or hides based on the visitor's login status.
Masteriyo adds a Masteriyo LMS panel to Appearance > Menus so you can place auth-aware links directly in any classic WordPress navigation menu. Each link resolves its destination URL at runtime and is shown or hidden automatically — logged-out visitors see Login and Register; logged-in visitors see My Account and Logout. No shortcodes, no custom CSS, no conditional logic required.
Location: Appearance > Menus → Masteriyo LMS panel (left sidebar)
Prerequisites
- Masteriyo LMS installed and activated
- A classic WordPress menu created under Appearance > Menus (WordPress block themes using the Site Editor use a different menu system — this feature applies to classic menus only)
Setting Up Navigation Menu Links
- Go to Appearance > Menus in your WordPress admin.
- In the left sidebar, find and expand the Masteriyo LMS panel.
- Check the items you want to add to your menu.
- Click Add to Menu.
- Drag the items into the position you want within the menu structure.
- Click Save Menu.
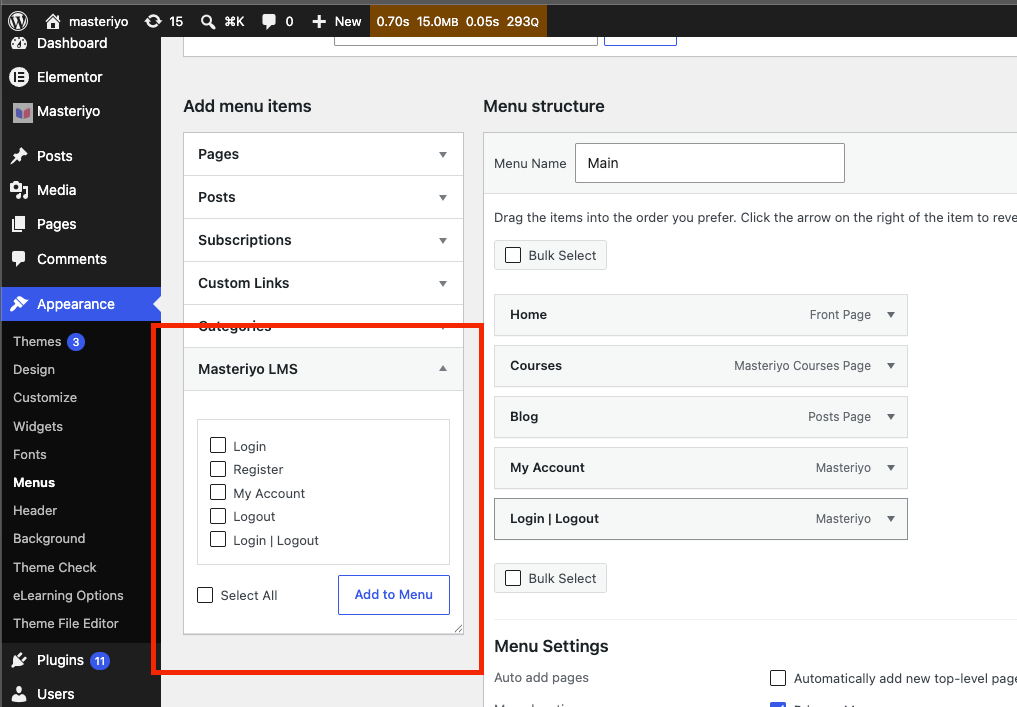
Tip: You can also reach the Masteriyo LMS panel directly from the notice that appears in Masteriyo > Settings > General > Pages. Click Configure Menus in the notice to go straight to the panel.
Available Menu Items
| Item | Default Label | Visible to |
|---|---|---|
| Login | Login | Logged-out visitors only |
| Register | Register | Logged-out visitors only |
| My Account | My Account | Logged-in users only |
| Logout | Logout | Logged-in users only |
| Login | Logout | Login / Logout | Everyone — switches automatically |
Each item shows a short hint below its Navigation Label field in the menu editor, describing its visibility rule. You do not need to remember which item is shown to whom — the hint is always visible when editing the menu.
Login | Logout Toggle
The Login | Logout item is a single menu link that switches both its label and its destination depending on whether the visitor is logged in or out:
- Logged out — displays your login label and links to the Masteriyo login page
- Logged in — displays your logout label and links to the secure logout URL
This is useful when you want a single menu slot that handles both states instead of two separate items.
Customizing Labels
You can change the visible text of any item by editing its Navigation Label in the menu editor — this works the same way as any other menu item.
Custom Labels for the Login | Logout Toggle
The Login | Logout toggle supports a special pipe-separated format so you can set different text for each state. In the Navigation Label field, enter the logged-out label, a pipe character (|), and then the logged-in label:
Sign In | Sign Out
The text before the pipe is shown to logged-out visitors; the text after the pipe is shown to logged-in users. If you do not include a pipe, the default translated labels Login and Logout are used.
How Visibility Works
Masteriyo filters the menu at render time — items that should not be shown to the current visitor are removed from the HTML entirely, not just hidden with CSS. This means:
- Logged-out visitors never receive the My Account or Logout links in the page source.
- Logged-in users never receive the Login or Register links in the page source.
- Child items nested under a hidden Masteriyo item are also removed automatically so they do not float to the top level of the menu.
The menu editor always shows all five items regardless of your own login state, so you can always see and edit the full set.
Admin Notice
When no Masteriyo menu items have been added to any menu yet, a dismissible notice appears in Masteriyo > Settings > General > Pages suggesting you configure your navigation menus.
- Click Configure Menus in the notice to jump directly to the Masteriyo LMS panel in Appearance > Menus.
- Click the × on the notice to dismiss it permanently for your account.
- The notice also disappears automatically the first time you add any Masteriyo item to a menu — no need to manually dismiss it.
Note: The notice is per-user and per-account. Dismissing it for one admin account does not dismiss it for other admins who have not yet set up their menus.
Was this article helpful to you?
Give us Rating
Last edited on July 28, 2026.
Edit this page