Certificate Builder V2New
Design beautiful course certificates with the new drag-and-drop Certificate Builder. Pick a template, drop in your text and logo, add elements like the student's name, then preview and export as a PDF.
The new Certificate Builder is a visual, drag-and-drop designer for course certificates. You start from a ready-made template (or a blank page), move things around with your mouse, and add elements that fill in each student's details automatically. When you are happy, you can preview it and export a PDF.
It works like a simple design tool — no code needed. This is different from the older Classic Certificate Builder.
Requirement: The new builder needs Masteriyo Pro. The Certificate Builder add-on itself is free, but creating a certificate with the new builder asks for an active Pro license. If your license is missing or expired, a license popup appears when you click Add New Certificate.
Prerequisites
| Requirement | Details |
|---|---|
| Masteriyo | Masteriyo |
| Add-on | Activate the Certificate Builder add-on from Masteriyo > Add-ons |
Opening the Certificate Builder
- In your WordPress dashboard, go to Masteriyo > Certificates.
- You will see the certificates screen. This is where all your certificates live.
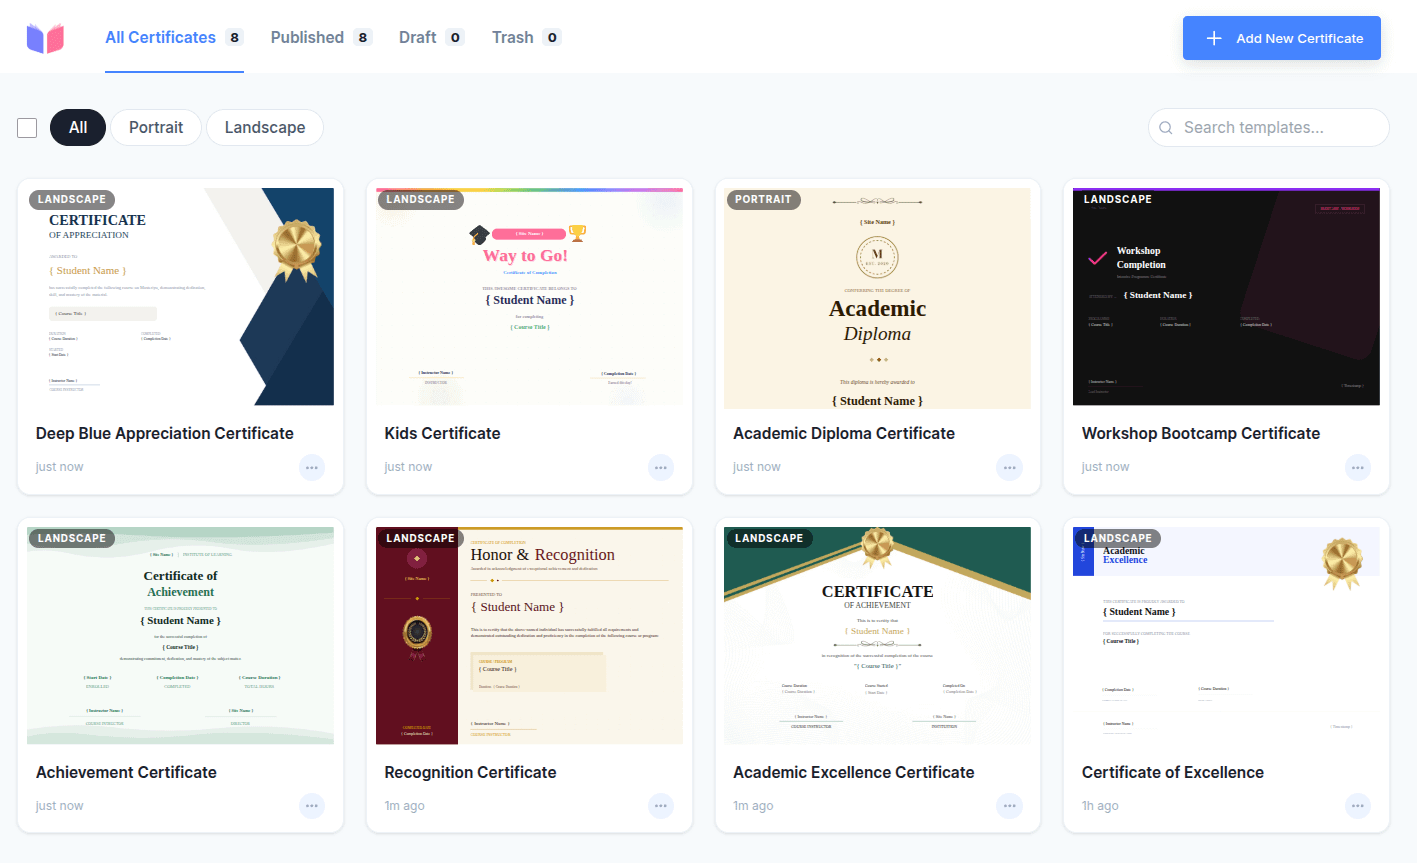
Here is what the screen offers:
| Area | What it does |
|---|---|
| All Certificates / Published / Draft / Trash | Tabs at the top that filter your certificates by status. Each tab shows a count. |
| All / Portrait / Landscape | Buttons that filter certificates by page shape. |
| Search templates… | A search box to find a certificate by name. |
| Add New Certificate | The button (top-right) to start a new certificate. |
Each certificate shows as a card with a small preview, its name, a Draft label if it is unpublished, and how long ago it was edited (for example, "3m ago").
Creating a Certificate
-
Click Add New Certificate.
Note: If your Pro license is inactive or expired, a license popup opens here and the next step is blocked. Add or renew your license to continue.
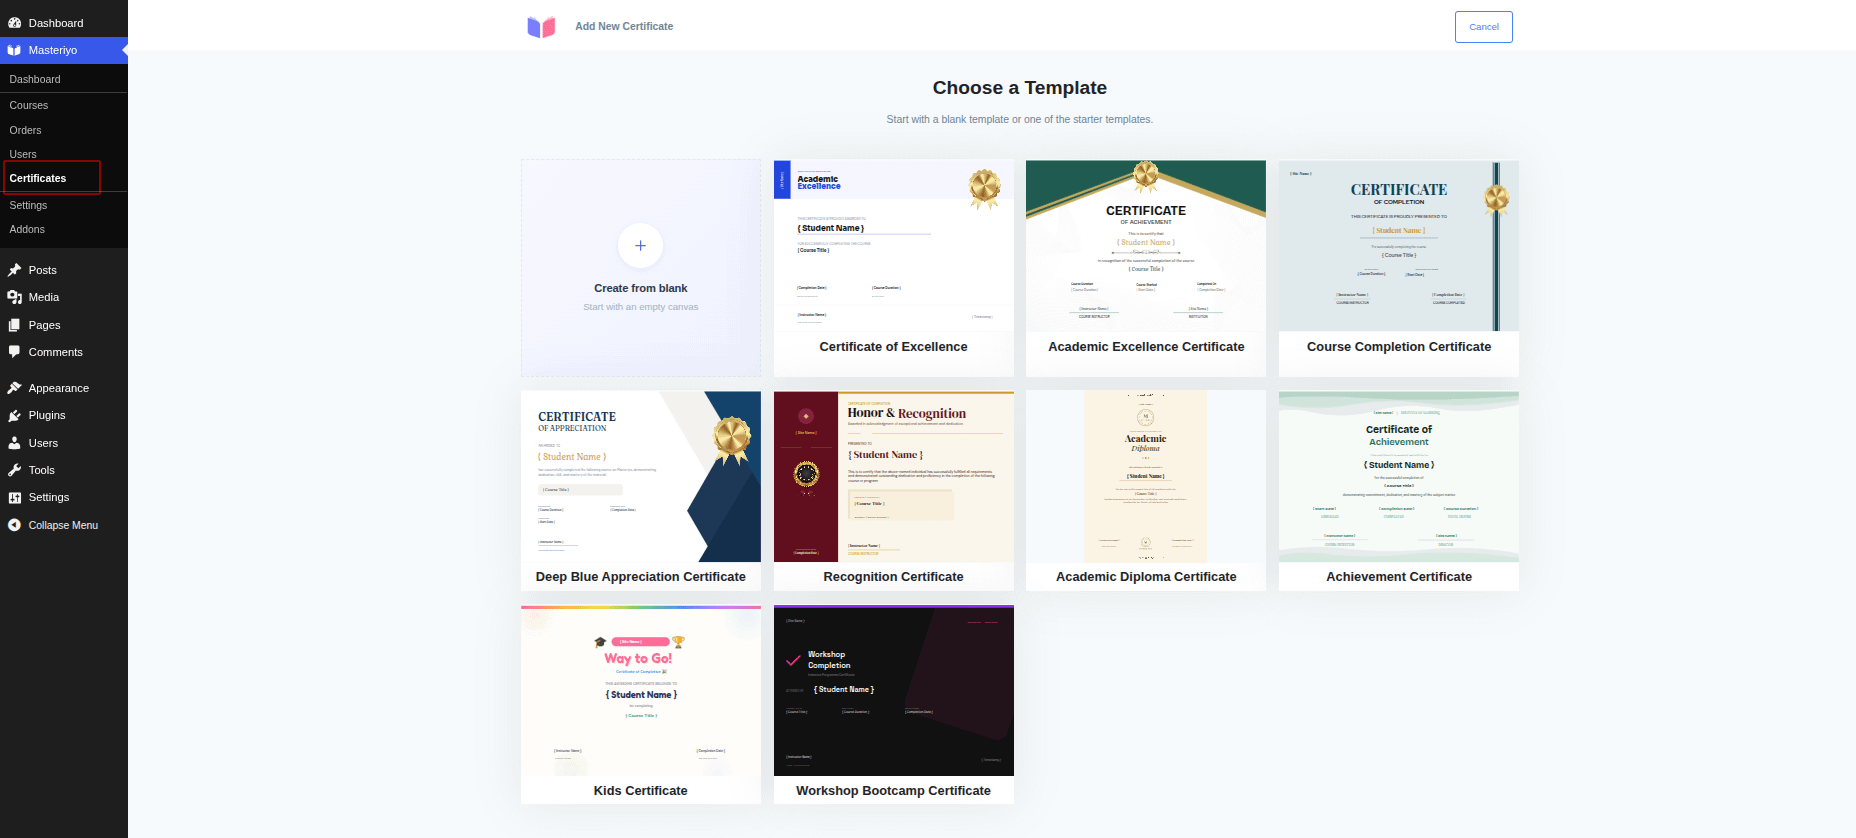
-
The Choose a Template screen opens. Pick how you want to start:
- Create from blank — start with an empty page.
- A starter template — pick one of the ready-made designs and customize it.
-
If you chose "Create from blank", a small New Project window asks for the page setup:
Option What to do Portrait / Landscape Choose the page orientation (tall or wide). Width / Height Type the page size. Unit Choose in (inches), cm, or px (pixels). Paper Size Quick presets — Letter, Tabloid, A0–A6, B4, B5, Executive, Folio. Click one to fill in the size for you. 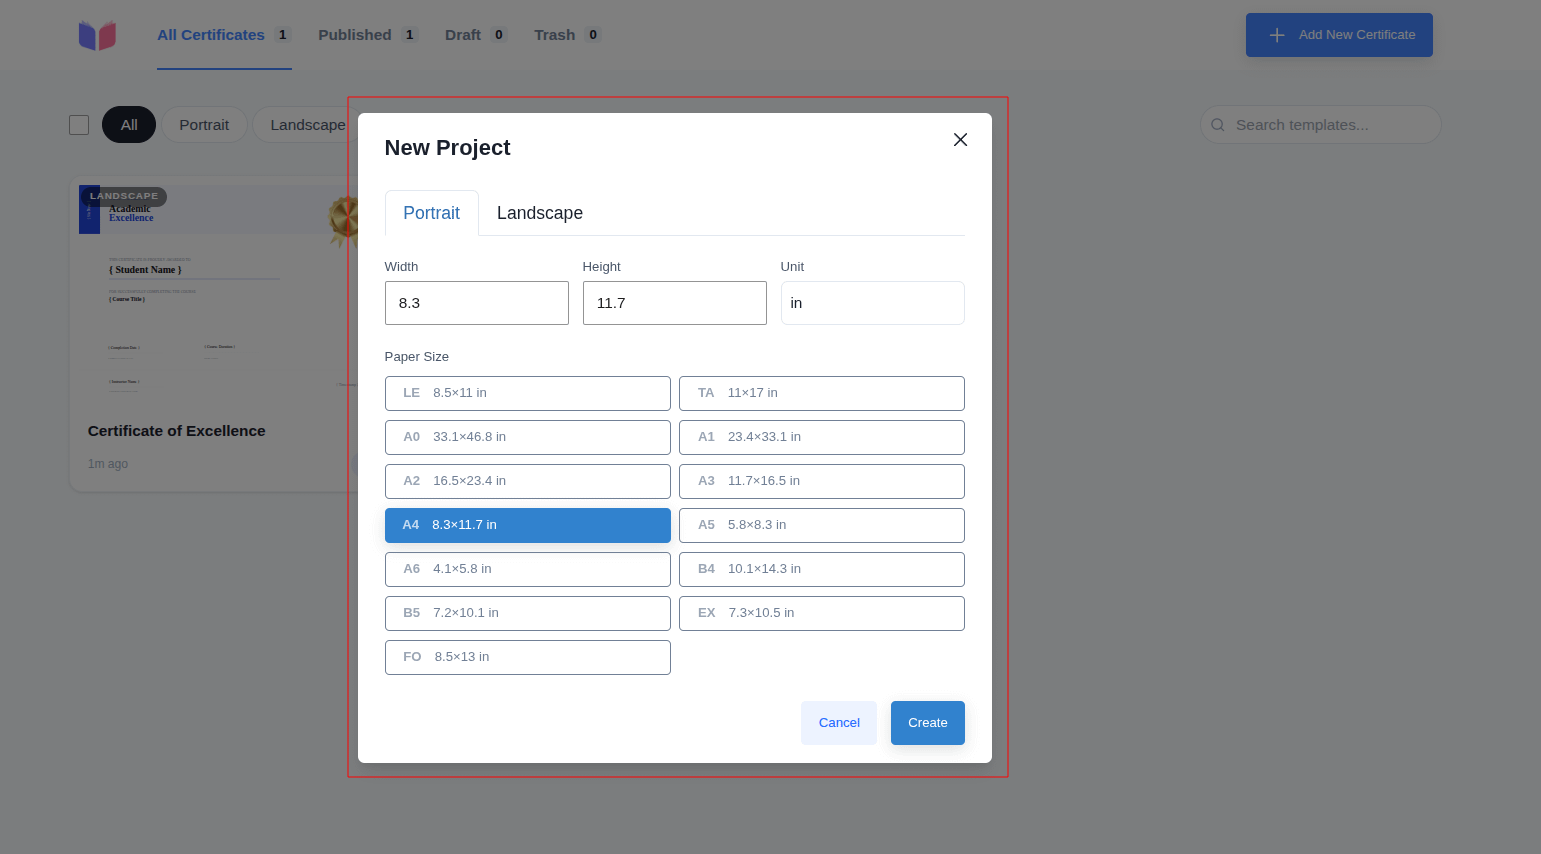
Tip: Keep the page a normal certificate size (A4 or Letter works well). Width and height cannot be more than 100 inches, and very large pages can be slow to preview.
-
Click Create. The certificate opens in the editor, ready to design.
(If you picked a starter template instead, it opens straight in the editor with the design already in place.)
Designing Your Certificate
The editor is where you build the design. It has three main areas:
- Top bar — the project title, Undo / Redo, a save status indicator, Preview, Publish, and a ⋮ menu (Save to Draft, Export as PDF, Delete design).
- Left panel — four tabs for adding and configuring content: Elements, Library, Background, and Settings.
- Right panel — the Layers list, showing every item on the page so you can select, reorder, and group them.
Note: Each certificate is a single page. To change its size or orientation later, use Settings → Resize Project (see below).
The left panel tabs
| Tab | What it does |
|---|---|
| Elements | Add new items to the page — Text, Image, Shape, Divider, and the Masteriyo LMS elements that fill in student and course details (see Adding Elements). |
| Library | Insert shapes and pictures, and upload images from your computer (they go to your WordPress Media Library). |
| Background | Set the page background. Pick one of the ready-made Masteriyo patterns, or use the Edit button above the canvas to add or replace a background image. |
| Settings | Document settings — Resize Project, View, and the Pixel Guide toggle. The title at the top shows the certificate name (click the pencil to rename) and the page size. |
Adding and arranging elements
- Open the Elements tab and add what you need — Text, Image, Shape, Divider, or a Masteriyo LMS element.
- Drag an element on the page to move it; drag its handles to resize; drag the round handle to rotate.
- Select an element to reveal its properties, then adjust the basics that apply to it — position and size, color or fill, and (for text) the font, size, alignment, and weight.
- Use the Layers panel on the right to select and reorder items (drag the handle). Stacking order top-to-bottom in the list matches front-to-back on the page; grouped items appear together as a Group. To group or ungroup a selection, use the right-click menu or the keyboard shortcuts below.
Aligning things precisely (Pixel Guide)
Turn on Settings → Pixel Guide to show measurement lines as you move elements. While it's on, hold Alt and hover over an element to see its distance from another — handy for lining things up and keeping even spacing.
Zooming
Use the zoom control at the bottom of the canvas to zoom in and out, or hold Ctrl/⌘ and scroll your mouse wheel (pinch to zoom on a trackpad).
Saving your work
You don't need a separate "Save" click for every change — the editor saves as you go. Watch the indicator near the top:
| Indicator | Meaning |
|---|---|
| Saving… | Your changes are being saved right now. |
| Unsaved changes | You have edits that are about to be saved. |
| Saved | Everything is saved. |
Keyboard Shortcuts
These shortcuts speed up designing. On a Mac, use ⌘ (Cmd) wherever Ctrl is shown.
| Action | Shortcut |
|---|---|
| Editing | |
| Undo | Ctrl + Z |
| Redo | Ctrl + Shift + Z |
| Copy | Ctrl + C |
| Paste | Ctrl + V |
| Duplicate | Ctrl + D |
| Select all (on the page) | Ctrl + A |
| Delete selected | Delete or Backspace |
| Deselect | Esc |
| Save | Ctrl + S |
| Move & nudge | |
| Move 1 px | Arrow keys (← ↑ → ↓) |
| Move 10 px | Shift + arrow keys |
| Arrange & layers | |
| Bring forward | Ctrl + ] |
| Send backward | Ctrl + [ |
| Bring to front | Ctrl + Alt + ] |
| Send to back | Ctrl + Alt + [ |
| Group | Ctrl + G |
| Ungroup | Ctrl + Shift + G |
| Zoom | |
| Zoom in | Ctrl + = (or Ctrl + +) |
| Zoom out | Ctrl + - |
| Zoom with the mouse | Hold Ctrl and scroll (pinch on a trackpad) |
Tip: Many of these actions are also on the right-click menu of a selected element — copy, paste, duplicate, delete, layer order, and alignment.
Adding Elements
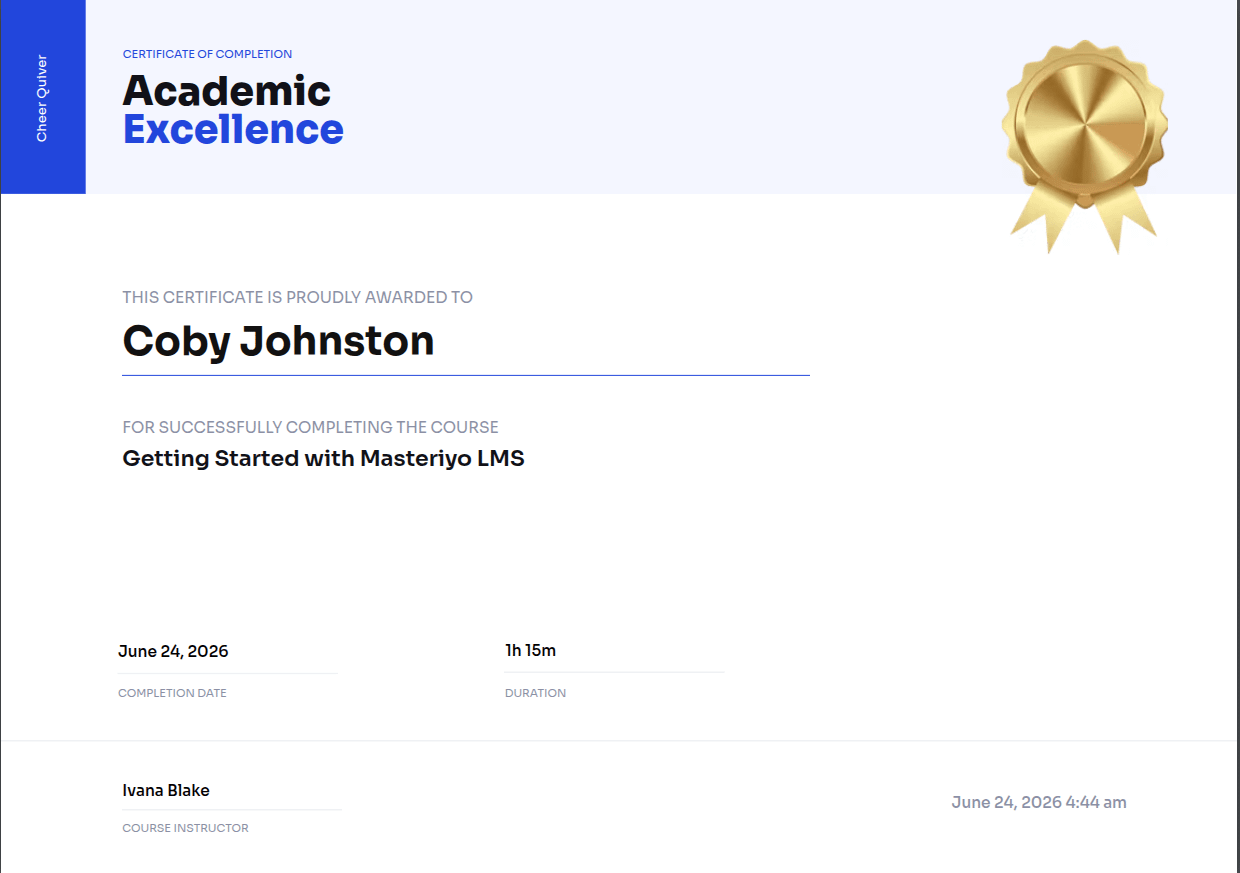
These elements are placeholders that fill in automatically for each student. For example, instead of typing a name, you drop in the Student Name element — and every student sees their own name on their certificate.
In the editor, open the Masteriyo LMS group in the left panel and drag the element you want onto the page. In the editor it shows as a placeholder like { Student Name }; on the real certificate it becomes the student's actual name.
| Elements | What it shows |
|---|---|
| Student Name (also First Name / Last Name) | The student's name. |
| Course Title | The name of the completed course. |
| Site Name | Your website's name. |
| Completion Date | The date the student finished the course. |
| Start Date | The date the student started the course. |
| Course Duration | How long the course took. |
| Instructor Name | The course instructor's name. |
| Current Date / Current Time / Timestamp | The date/time the certificate is generated. |
| QR Code Pro | A scannable code that links to the certificate's verification page. |
| Verify Code Pro | A unique text code used to verify the certificate. |
| Grade Result Pro | The student's final grade. Appears only if the Gradebook add-on is active. |
| Co-Instructors Pro | Names of additional instructors. Appears only if the Multiple Instructors add-on is active. |
Note: You only see the fields that apply to your setup. Grade Result needs the Gradebook add-on and Co-Instructors needs the Multiple Instructors add-on before they appear.
Previewing and Exporting as PDF
To check your design or get a PDF, open the menu (the ⋮ icon) in the editor's top bar:
- Preview — opens a PDF preview of the certificate in a new browser tab.
- Export as PDF — opens the certificate as a downloadable PDF in a new tab.
Tip: If Preview or Export does nothing, your page may be too large to render. Reduce the width or height and try again.
Managing Your Certificates
Back on the Masteriyo > Certificates screen, each certificate card has a ⋮ menu:
- Edit — open it in the editor.
- Duplicate — make a copy to reuse a design.
- Move to Trash — remove it (you can restore it later).
On the Trash tab, the menu shows:
- Restore — put the certificate back.
- Delete Permanently — remove it for good.
Working with several at once (bulk actions)
- Click the checkbox in the toolbar to turn on selection mode.
- Tick the certificates you want.
- A bar appears at the bottom with the available action — Move to Trash (or Restore / Delete Permanently on the Trash tab).
Giving a Certificate to a Course
A certificate is only awarded once you attach it to a course.
- Go to Masteriyo > Courses and open the course Builder.
- Open the Settings tab.
- Turn on Enable Certificate.
- In Select Certificate, search and choose your certificate. Certificates made with the new builder appear under Certificate V2; older ones appear under Classic Certificates. (Only published certificates show up here.)
- (Optional) Turn on Send Certificate via Email to email it to students after they finish.
- (Optional) Turn on Allow Certificate Sharing to let students share it from the course page.
- Save the course.
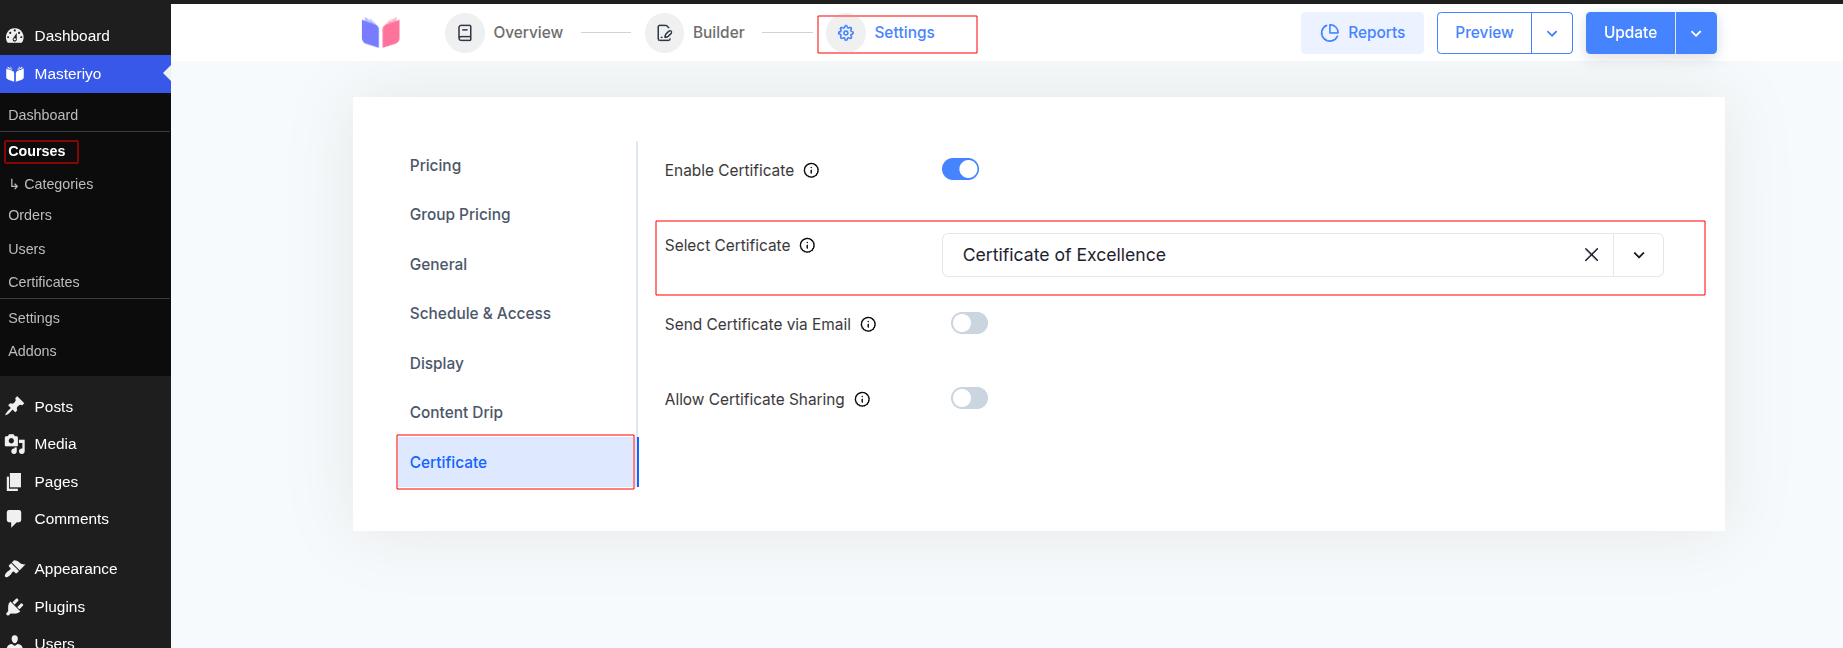
Note: Only published certificates appear in the dropdown. If you don't see yours, open it in the editor and publish it first.
Note: Certificates are generated fresh on each download — they are not stored per student. So if a course previously used an older Certificate (V1) and you switch it to a Certificate V2 here, every student (including those who finished earlier) gets the latest assigned certificate the next time they preview or download it.
What Students See
Once a student completes the course, they can get their certificate in a few places:
- Account page → Your Certificates — each course shows a Preview button (opens the certificate) and a Download Certificate button (downloads the PDF).
- Course completion — a Download Certificate link appears when they finish the course.
- Single course page — if sharing is enabled, a Share your certificate button appears.
Free vs Pro
Masteriyo has two certificate builders:
- The Classic Certificate Builder (free) — the original certificate builder. See the Classic Certificate Builder guide.
- The new Certificate Builder (this guide) — the drag-and-drop designer, which needs Masteriyo Pro.
Here's what each gives you:
| Capability | Free | Pro |
|---|---|---|
| New drag-and-drop builder | — | ✓ |
| Published certificate templates | Up to 2 | Unlimited |
| Element — QR Code | — | ✓ |
| Element — Verify Code | — | ✓ |
| Element — Grade Result | — | ✓ (needs the Gradebook add-on) |
| Element — Co-Instructors | — | ✓ (needs the Multiple Instructors add-on) |
| Download / email certificates to students | ✓ | ✓ |
| Certificate sharing | ✓ | ✓ |
Free version limit: With the free plugin you can publish up to 2 certificate templates. If you try to publish a third, Masteriyo asks you to upgrade. Upgrade to Masteriyo Pro for unlimited templates and the new drag-and-drop builder.
Frequently Asked Questions
Why does a license popup appear when I click "Add New Certificate"?
The new builder is a Pro feature. Add or renew your Masteriyo Pro license to create certificates with it.
My certificate won't preview or export.
The page is probably too large. Lower the width or height (keep it to a normal certificate size) and try again.
The QR code looks fine in the PDF but had a box around it on screen.
The downloaded PDF is the final result — the QR code there is clean and scannable.
I finished a course but didn't get a certificate.
Make sure the certificate is published and attached to that course under Course > Settings > Select Certificate.
Was this article helpful to you?
Give us Rating
Last edited on June 25, 2026.
Edit this page