Groups
Sell courses to teams and organizations with flexible pricing tiers, fixed or variable seats, volume discounts, and group management features.
What is the Groups Feature?
The Groups feature allows you to sell your courses to teams and organizations. Instead of selling to individual students, you can sell to groups with features like:
- Multiple pricing tiers for different team sizes
- Group leader management where buyers can add/remove team members
- Flexible seat configurations with volume discounts
- Administrative controls for enrollment and approvals
What is Multiple Group Pricing? (v3.1.0+) Pro
Starting with version 3.1.0, Groups includes multiple group pricing capability, allowing you to create multiple pricing tiers for the same course. Instead of having just one group price, you can offer different options like "Small Team," "Medium Business," and "Enterprise" - each with their own pricing structure and seat configurations.
Think of it like SaaS pricing plans, but for your courses. You can offer volume discounts, flexible seat ranges, and tiered pricing to attract different customer segments.
Key Benefits
- Available for All Plans: Groups is available on every Masteriyo plan; any paid plan unlocks unlimited tiers, variable seats, and tiered pricing
- Flexible Pricing Tiers: Create unlimited pricing options (paid plans) or 1 tier (Free)
- Volume Discounts: Reward larger purchases with better per-seat prices (paid plans)
- Fixed or Variable Seats: Offer specific seat counts (all plans) or flexible ranges (paid plans)
- Tiered Pricing Model: Set different per-seat prices for different quantity ranges (paid plans)
- Enterprise-Ready: Perfect for B2B course sales and corporate training
- Automatic Migration: Seamlessly upgrades from legacy single group pricing
Prerequisites
- Masteriyo Free or any paid plan
- Version 3.1.0 or higher
- Groups addon enabled
Note: The Free plan is limited to 1 pricing tier with fixed seats only. Paid plans unlock unlimited tiers, variable seats, and advanced pricing models.
Differences from Legacy Group Pricing
Legacy Single Group Pricing
The old system allowed only one group pricing option:
- Single fixed price (e.g., $500 for 10 people)
- One maximum group size
- Simple but limited
New Multiple Group Pricing (v3.1.0+)
The new system provides enterprise-level flexibility:
- Multiple pricing tiers per course (paid plans: unlimited, Free: 1 tier)
- Two seat models: Fixed seats (all plans) or Variable seats (paid plans)
- Two pricing models: Per-seat or Tiered pricing (paid plans)
- Volume discounts through tiered pricing (paid plans)
- Available across all Masteriyo plans with progressive features
Note: If you were using legacy group pricing, your existing settings will automatically migrate to a single pricing tier in the new format.
Understanding Seat Models
| Feature | Fixed Seats | Variable Seats |
|---|---|---|
| What it is | A specific, unchangeable number of seats | A range of seats customers can choose from (min-max) |
| Pricing | One total price for all seats | Two options (see Pricing Models below) |
| Example | "Small Team - 10 seats for $1,000" | "Enterprise - Choose 11-50 seats" |
| Use case | Standard team sizes, package deals | Scalable teams, custom group sizes |
| Availability | All plans, including Free | Paid plans only |
| Best for | Predefined team packages | Flexible, varying team sizes |
Understanding Pricing Models
Pricing models only apply to Variable Seats (paid plans only).
| Feature | Per-Seat Pricing | Tiered Pricing |
|---|---|---|
| Formula | Price per seat × Number of seats | Different per-seat prices for different quantity ranges |
| Example | $50/seat × 20 seats = $1,000 | • 11-25 seats: $45/seat • 26-50 seats: $40/seat • 51-100 seats: $35/seat |
| Calculation | Single rate applies to all seats | Rate depends on total quantity selected (e.g., 30 seats × $40 = $1,200) |
| Use case | Simple, predictable pricing | Encourage larger purchases with volume discounts |
| Display | Shows "$50/seat" | Shows price range "$45-$35/seat" |
| Best for | Straightforward pricing needs | Incentivizing bulk purchases |
Setting Up Multiple Group Pricing
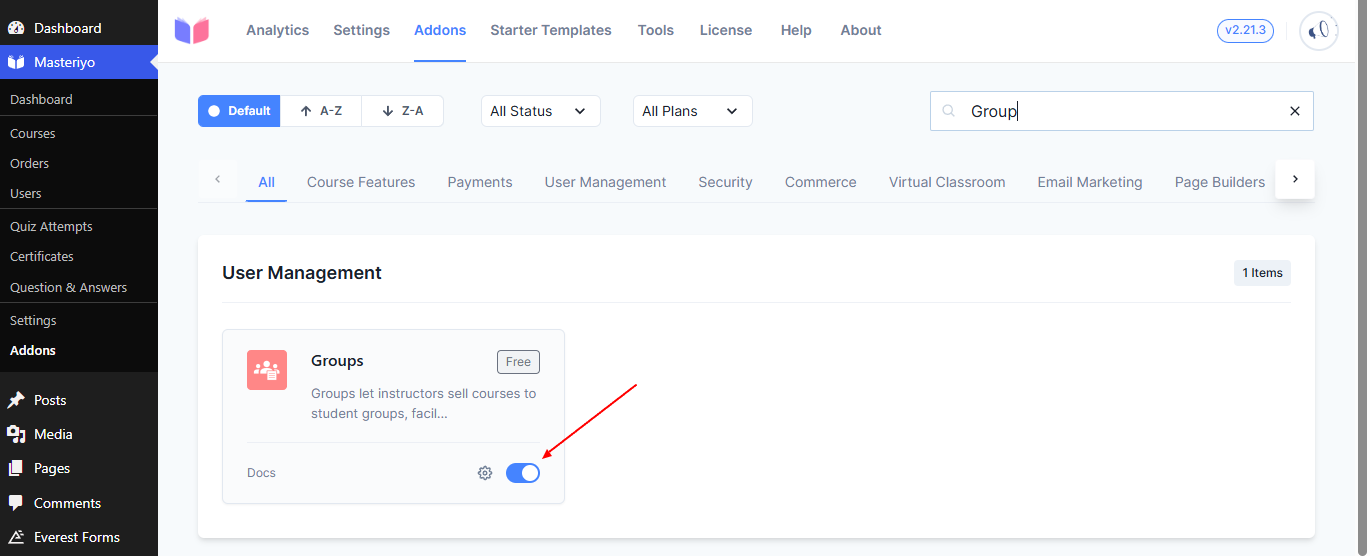
Step 1: Enable Groups Addon
- Go to Masteriyo → Addons
- Find Groups addon
- Click Activate
Step 2: Enable Group Pricing for Your Course
- Go to Masteriyo → Courses
- Edit the course you want to sell to groups
- Click the Settings tab in the course builder
- Go to Group Pricing section
- Toggle on Sell to Groups
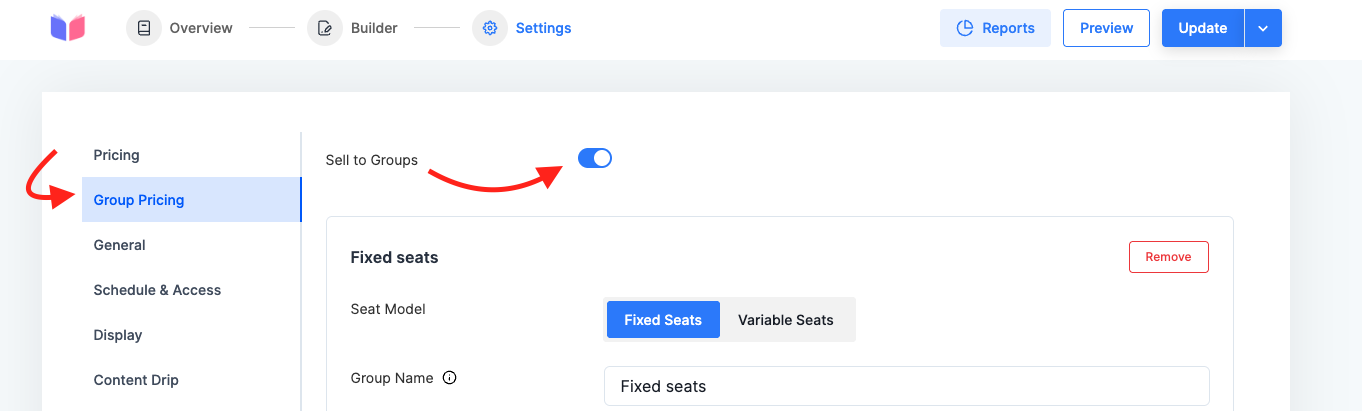
(Image: Course setting for group pricing.)
Step 3: Create Your First Pricing Tier
When you enable "Sell to Groups," you'll see options to create pricing tiers:
-
Click Add Group Pricing (or configure the default tier)
-
Enter a Group Name (e.g., "Small Team," "Enterprise")
-
Choose your Seat Model:
- Fixed Seats: Enter a specific number (e.g., 10)
- Variable Seats: Enter min and max range (e.g., 5-50)
-
If you chose Variable Seats, select Pricing Model:
- Per Seat: Enter price per seat
- Tiered Pricing: Add price tiers (see example below)
-
Set Regular Price and optionally Sale Price
-
Choose Pricing Type: One-time (recurring coming soon)
Step 4: Add More Tiers (Pro/Elite Plans) Pro
Want to offer multiple options? Click Add Pricing Tier again and repeat:
- Create different tiers for different customer segments
- Mix fixed and variable seat models
- Offer volume discounts through tiered pricing
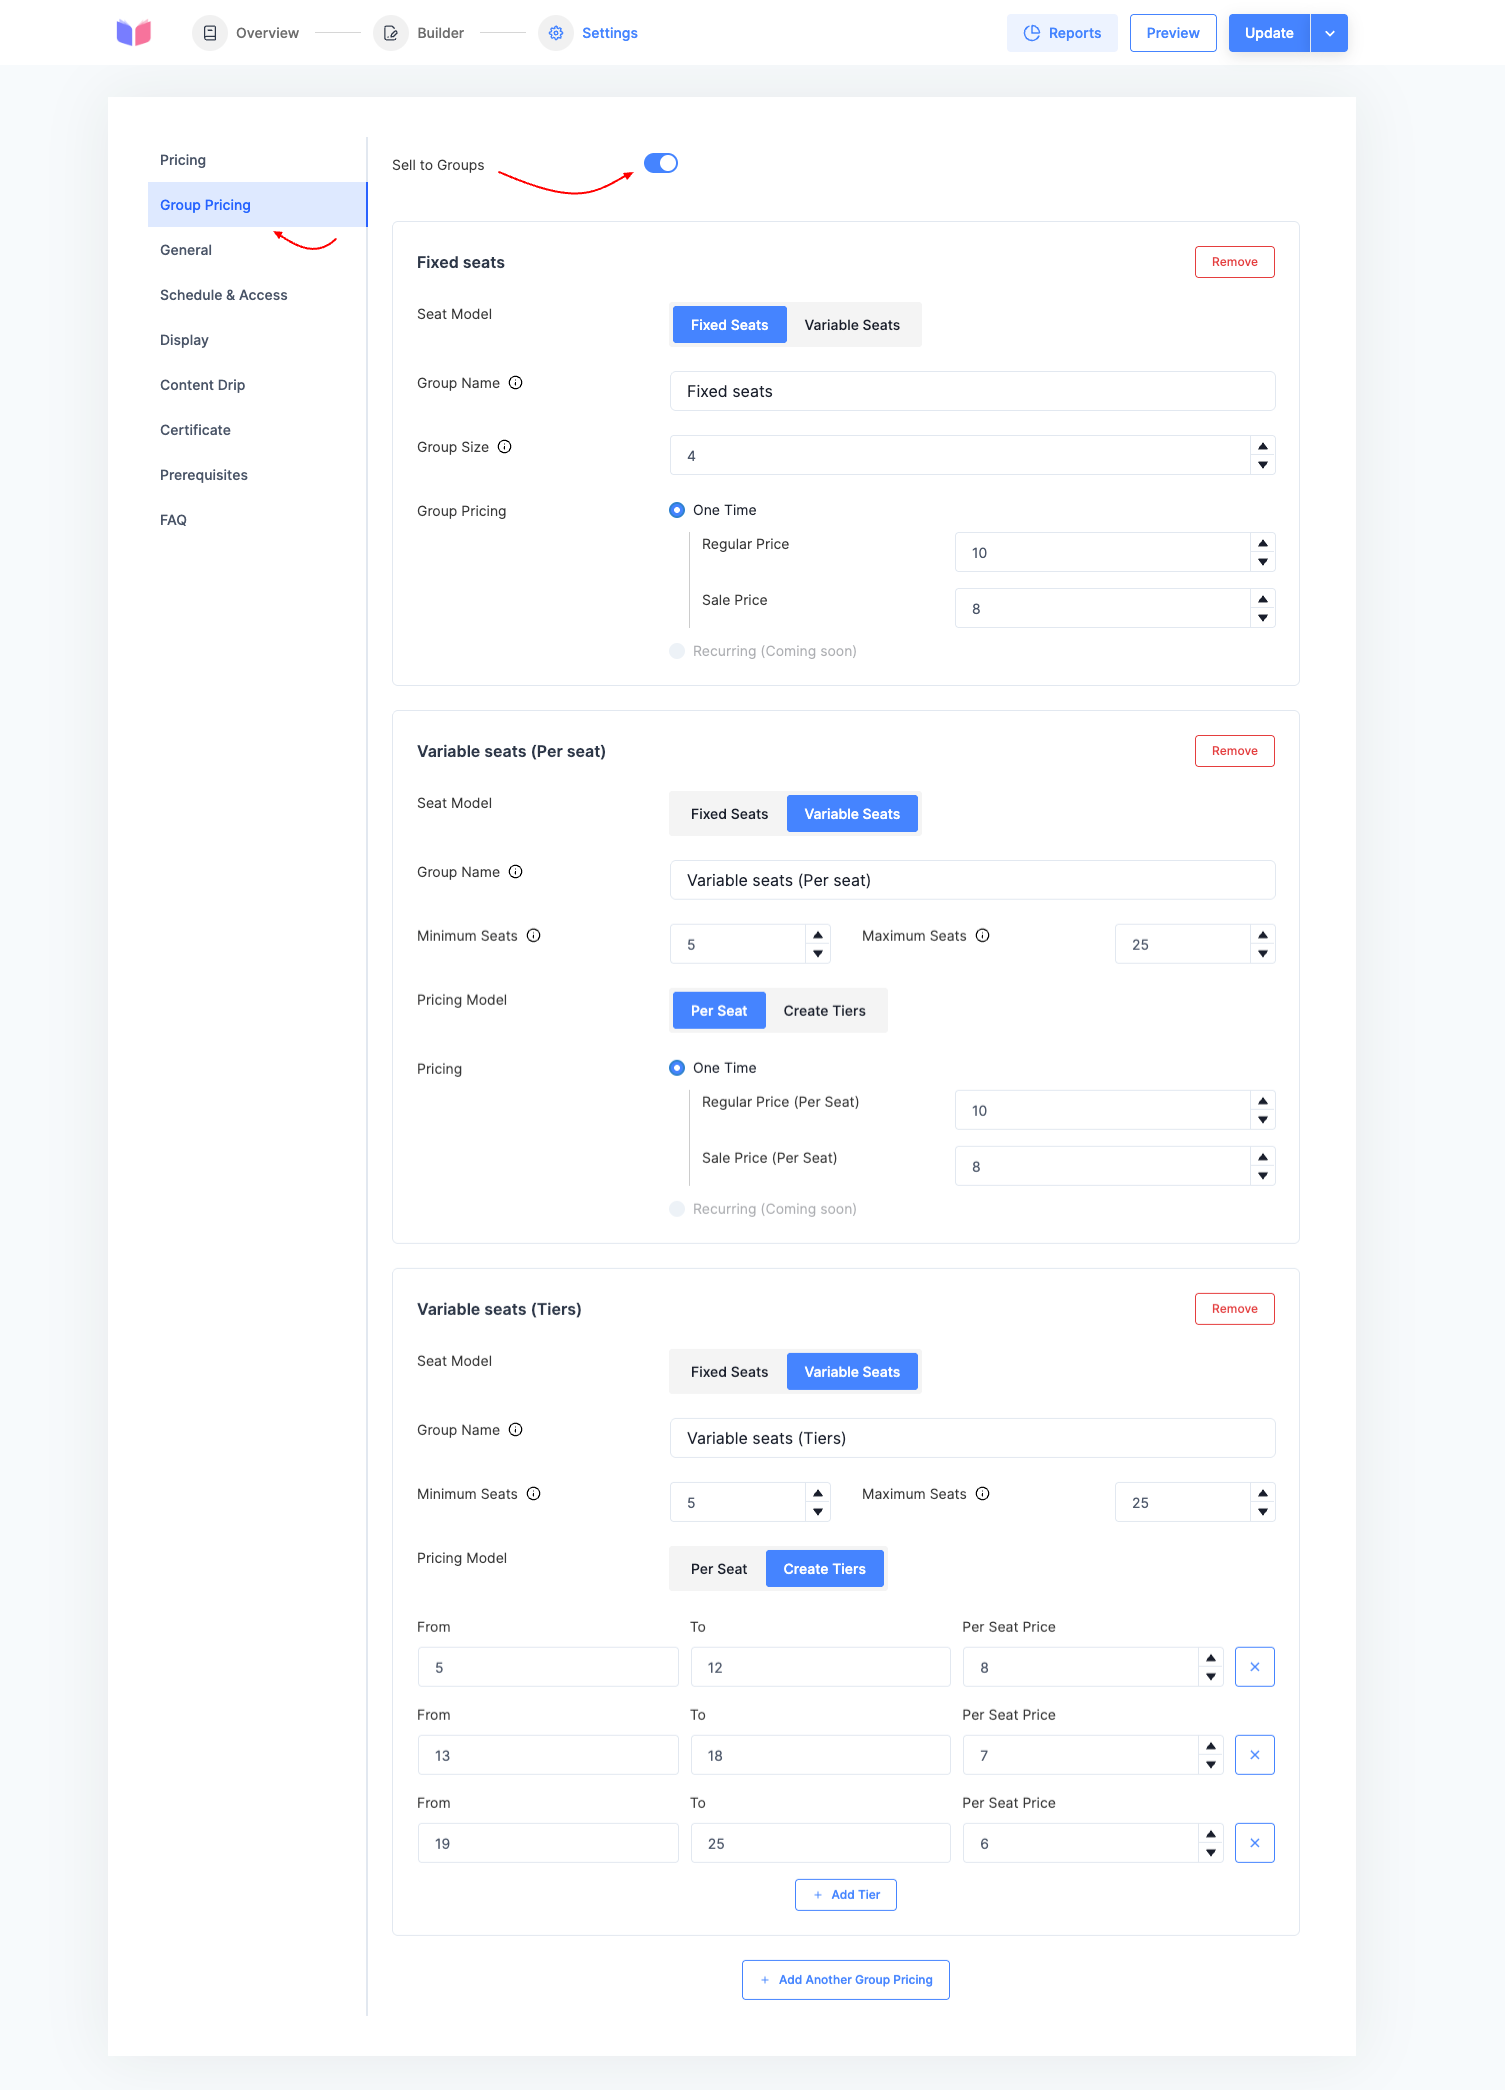
(Image: Shows all group pricing options in course setting.)
Step 5: Save Your Course
Click Update to save your group pricing configuration.
Configuration Examples
Example 1: Simple Fixed Seat Packages
Perfect for standardized team training:
Tier 1: Small Team
- Seat Model: Fixed Seats
- Group Size: 10 seats
- Regular Price: $1,000
- Result: $1,000 for exactly 10 people
Tier 2: Medium Team
- Seat Model: Fixed Seats
- Group Size: 25 seats
- Regular Price: $2,200
- Result: $2,200 for exactly 25 people
Tier 3: Enterprise
- Seat Model: Fixed Seats
- Group Size: 100 seats
- Regular Price: $7,500
- Result: $7,500 for exactly 100 people
Example 2: Flexible Per-Seat Pricing Pro
Perfect for scalable teams:
Tier 1: Growing Team
- Seat Model: Variable Seats (5-20)
- Pricing Model: Per Seat
- Regular Price: $100/seat
- Results:
- 5 seats = $500
- 10 seats = $1,000
- 20 seats = $2,000
Tier 2: Enterprise Flex
- Seat Model: Variable Seats (21-100)
- Pricing Model: Per Seat
- Regular Price: $85/seat
- Results:
- 25 seats = $2,125
- 50 seats = $4,250
- 100 seats = $8,500
Example 3: Advanced Tiered Pricing with Volume Discounts Pro
Perfect for encouraging larger purchases:
Tier: Enterprise Volume Pricing
- Seat Model: Variable Seats (10-100)
- Pricing Model: Tiered Pricing
- Pricing Tiers:
- 10-25 seats: $80/seat
- 26-50 seats: $70/seat
- 51-100 seats: $60/seat
Results:
- Buy 15 seats = 15 × $80 = $1,200
- Buy 30 seats = 30 × $70 = $2,100
- Buy 75 seats = 75 × $60 = $4,500
Benefit: Customers save more per seat when buying in larger quantities.
Example 4: Mixed Strategy (Most Flexible)
Combine different models to cover all customer types:
Tier 1: Starter Package (Fixed)
- Fixed 5 seats for $400
- Perfect for small teams who want simple pricing
Tier 2: Team Plan (Variable + Per Seat)
- Variable 6-20 seats at $75/seat
- Flexible for growing teams
Tier 3: Enterprise Volume (Variable + Tiered)
- Variable 21-100 seats
- Tiered: 21-50 = $65/seat, 51-100 = $55/seat
- Volume discounts for large organizations
How It Works for Customers
Frontend Experience
When customers visit your course page with multiple group pricing enabled, they see:
- All available pricing tiers displayed as cards/options
- Tier name and pricing clearly shown
- Seat selection dropdown (for variable seats)
- Real-time price calculation as they select seats
- "Buy for Group" button for each tier
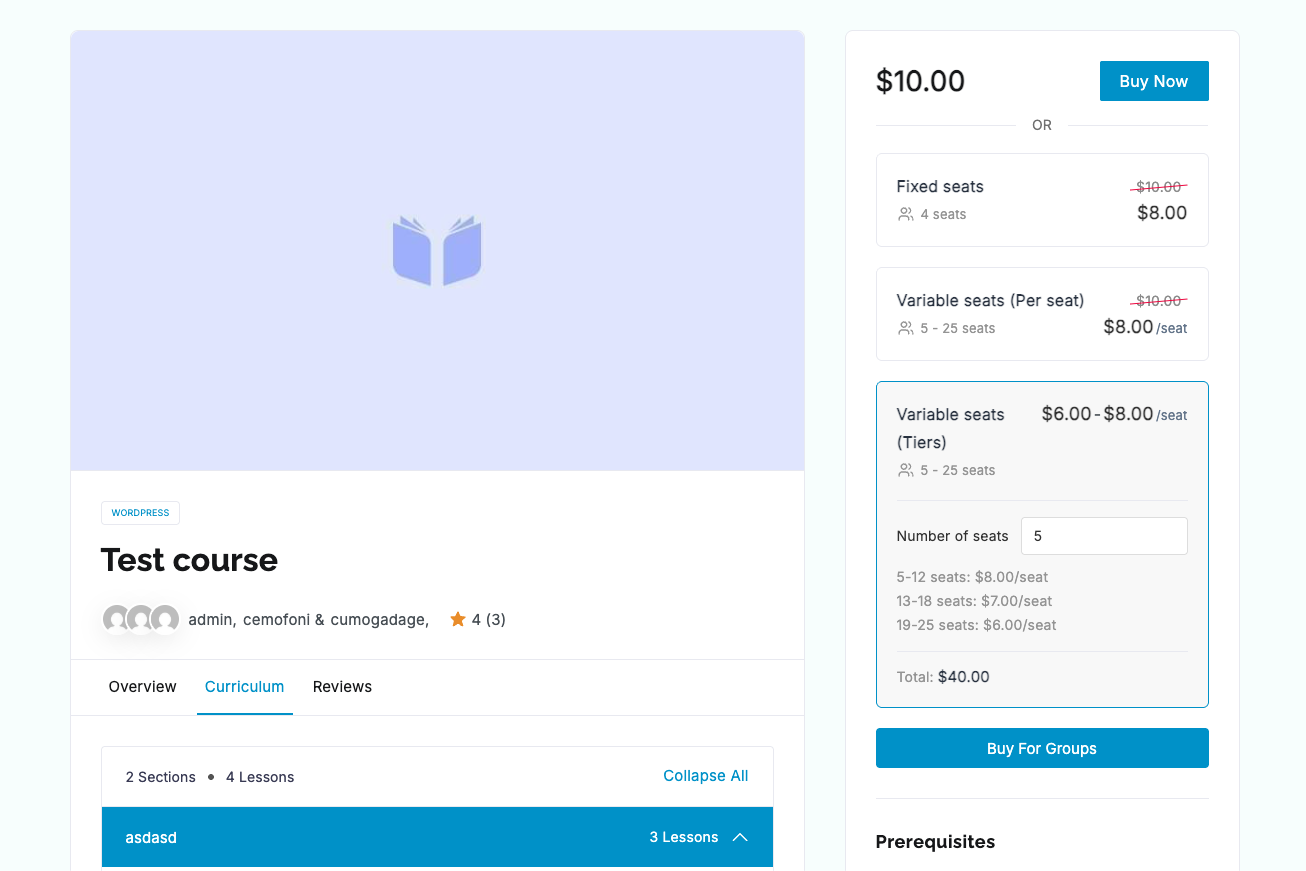
(Image: Single course page group pricing UI.)
Purchasing Workflow
- Customer views all available tiers
- Selects their preferred tier (radio button)
- If variable seats: chooses number of seats from dropdown
- Sees total price calculate automatically
- Clicks "Buy for Group" button
- Proceeds to checkout with selected configuration
- Completes payment
After Purchase
- Order is created with group details
- Admin receives notification
- Admin approves the order (changes status to Completed)
- Customer receives email notification
- Customer can add members to their group from their dashboard
- Group members receive invitation emails
- Members can access the course once enrolled
Setting Up Tiered Pricing Pro
Tiered pricing can be tricky, so here's a detailed walkthrough:
Step 1: Choose Variable Seats
- In your pricing tier configuration
- Select Seat Model: Variable Seats
- Enter min and max (e.g., Min: 10, Max: 100)
Step 2: Select Tiered Pricing Model
- Under Pricing Model, choose Tiered Pricing
- You'll see options to add price tiers
Step 3: Add Price Tiers
For each price break, add a tier:
| Tier | From | To | Per Seat Price | Total Cost (Min-Max) |
|---|---|---|---|---|
| 1 | 10 | 25 | $80 | $800 - $2,000 |
| 2 | 26 | 50 | $70 | $1,820 - $3,500 |
| 3 | 51 | 100 | $60 | $3,060 - $6,000 |
Step 4: Verify Your Setup
Make sure:
- Ranges don't overlap
- Ranges cover your entire min-max range (10-100)
- Prices decrease as quantity increases (volume discount)
- There are no gaps between ranges
Important: The "From" of each tier should be 1 more than the "To" of the previous tier.
Managing Groups
Group Settings
Navigate to Masteriyo → Users → Groups to manage group settings:
Deactivate Enrollment on Status Change
- Automatically deactivate member enrollments when group is trashed/deleted
- Reactivates enrollments when group is restored
Deactivate Enrollment on Member Change
- Deactivate enrollment when a member is removed from the group
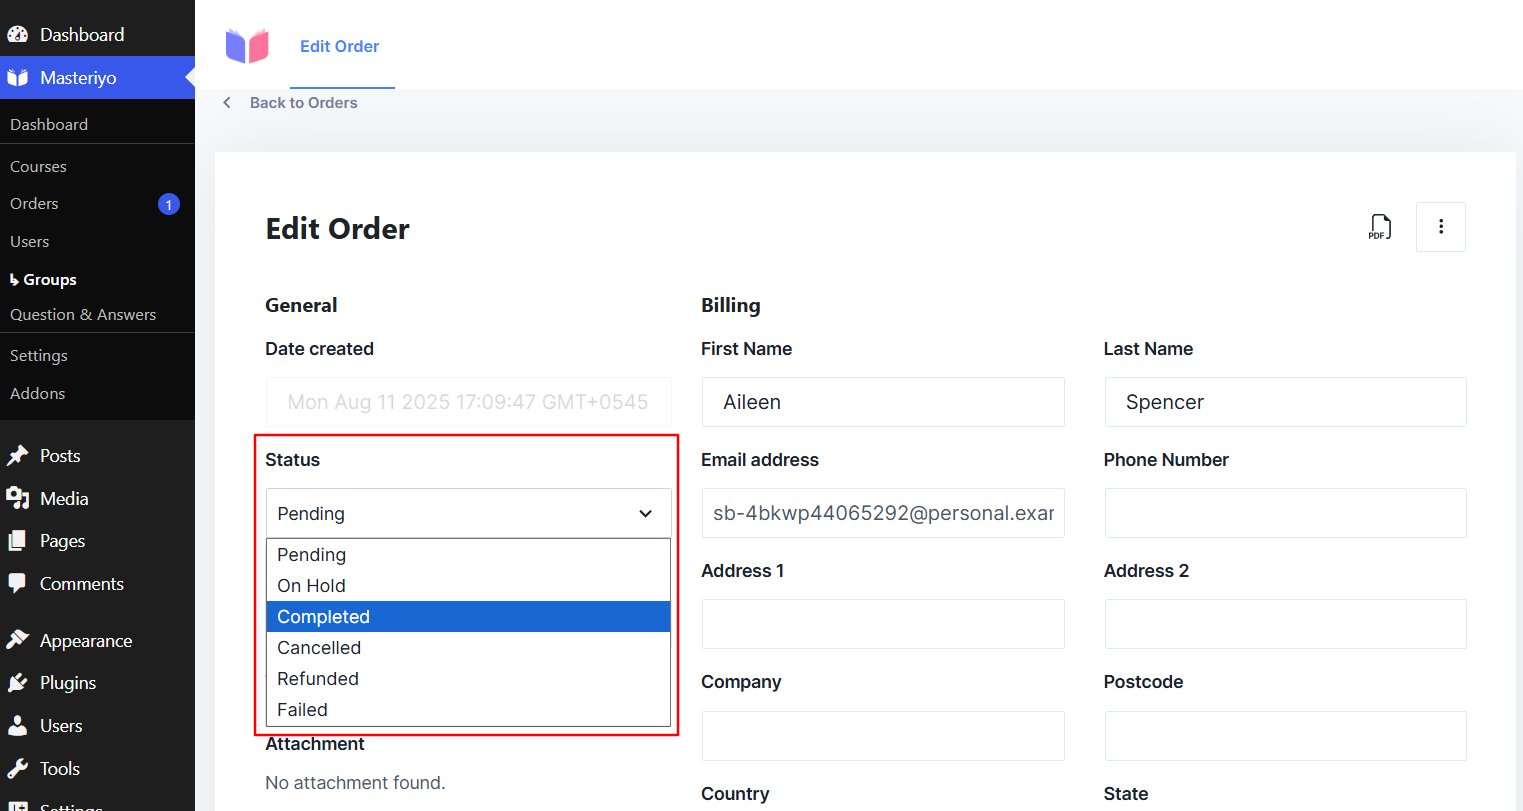
Approving Group Orders
After a customer purchases a group course:
- Go to Masteriyo → Users → Groups
- Find groups with "Draft" status (pending approval)
- Click on the group to view details
- Verify the order and payment
- Go to the associated order
- Change order status to Completed
- Customer receives notification and can add members
Viewing All Groups (Admin)
From Masteriyo → Users → Groups, administrators can:
- See all groups and their status
- View member lists
- Check enrolled courses
- Monitor group activity
- Edit group details
Group Leader Account Page
When a customer purchases a course for a group, they become the group leader and gain access to powerful management tools through their account page.
Accessing the Groups Page
Group leaders can access their groups management from:
- Log into their account
- Navigate to Account → Groups from the sidebar menu
- View all groups they've created/purchased
Note: The Groups menu item only appears for users who have purchased at least one group course.
What Group Leaders Can Do
1. View All Their Groups
On the Groups page, group leaders see:
- List of all their groups with group names
- Status badges (Pending approval / Active)
- Member count (hover to see details)
- Edit and Delete buttons for each group
- Associated courses linked to each group
2. Add Group Members
After admin approves the group (order status = Completed), group leaders can add members:
How to Add Members:
- Click Edit on a group
- In the Members section, enter email addresses
- Press Enter or comma after each email to add it
- Click Save to update the group
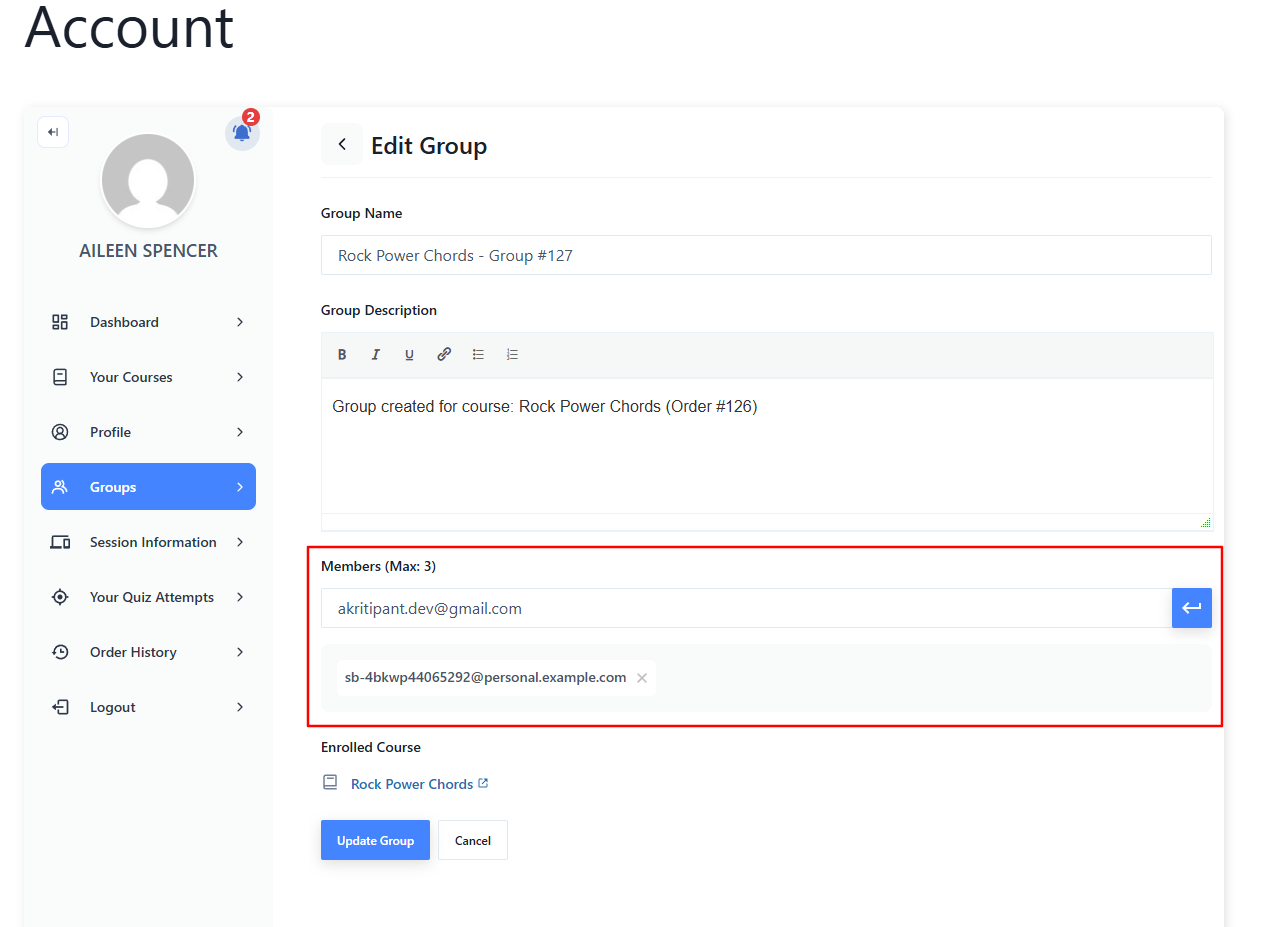
Important Notes:
- Each email must be valid (validated automatically)
- Cannot add duplicate emails
- Maximum members limited by purchased seat count
- Members receive invitation emails automatically
- Cannot add members while group is pending approval
Pending Approval Notice: If the group is still in "Draft" or "Pending" status, group leaders will see:
"Group is pending approval. Members cannot be modified until the group is approved."
They must wait for admin approval before adding members.
3. Remove Group Members
Group leaders can remove members from their groups:
How to Remove Members:
- Click Edit on the group
- In the Members section, find the member's email tag
- Click the X button on the email tag
- Click Save to update
Important Restrictions:
- Cannot remove themselves - The group leader's email cannot be removed
- Removed members lose access to group courses (if settings enable this)
- Removed members receive notification emails (if configured)
4. Edit Group Details
Group leaders can customize their group information:
Editable Fields:
- Group Name (required) - Give your group a meaningful name
- Group Description - Add details about the group (supports rich text/HTML)
- Members List - Add or remove member emails
Non-Editable Fields:
- Group leader/owner (only admins can change)
- Group status (pending/approved - admin controlled)
- Associated courses (determined by purchase)
- Maximum group size (determined by purchased tier)
How to Edit:
- Click Edit button on any group
- Update the Group Name or Description
- Modify members if needed
- Click Save Changes
5. View Linked Courses
Group leaders can see which courses are associated with their group:
- Course names displayed in the group details
- Course count shown on group card
- Read-only view - Cannot add/remove courses (determined by purchase)
- Members automatically get enrolled in these courses once added
6. Delete Groups
Group leaders can delete groups they no longer need:
How to Delete:
- Click Delete button on the group card
- Confirm deletion in the dialog
- Group is permanently removed
What Happens When Deleted:
- All member enrollments are deactivated (if settings configured)
- Members lose access to group courses
- Cannot be undone (permanent deletion)
- Associated order remains in history
Group Status & Workflow
Pending Approval (Draft Status)
When a group leader first purchases a group course:
Status: Draft/Pending What They See:
- "Pending" badge on group card
- Cannot add members yet
- Message: "Waiting for admin approval"
What They Can Do:
- View the group
- View their purchase/order details
- Wait for admin approval
What They Cannot Do:
- Add or remove members
- Edit certain group details
Active (Published Status)
After admin approves the order (status = Completed):
Status: Published/Active What They See:
- No "Pending" badge
- Full editing capabilities unlocked
- Can manage members
What They Can Do:
- Add members (up to seat limit)
- Remove members
- Edit group name and description
- Delete the group
- View all linked courses
Permission Summary
| Action | Group Leader | Admin |
|---|---|---|
| View own groups | ✅ Yes | ✅ Yes |
| View all groups | ❌ No | ✅ Yes |
| Add members | ✅ Yes (after approval) | ✅ Yes |
| Remove members | ✅ Yes (except self) | ✅ Yes |
| Edit group name/description | ✅ Yes | ✅ Yes |
| Change group status | ❌ No | ✅ Yes |
| Change group leader | ❌ No | ✅ Yes |
| Delete group | ✅ Yes (own groups) | ✅ Yes |
| Approve orders | ❌ No | ✅ Yes |
Important Restrictions for Group Leaders
- Cannot access other users' groups - Only see and manage their own groups
- Cannot remove themselves - Group leader must remain in the group
- Cannot change approval status - Only admins can approve/publish groups
- Cannot exceed seat limits - Maximum members determined by purchased tier
- Cannot modify while pending - Must wait for admin approval to add members
- Cannot transfer ownership - Only admins can change group leaders
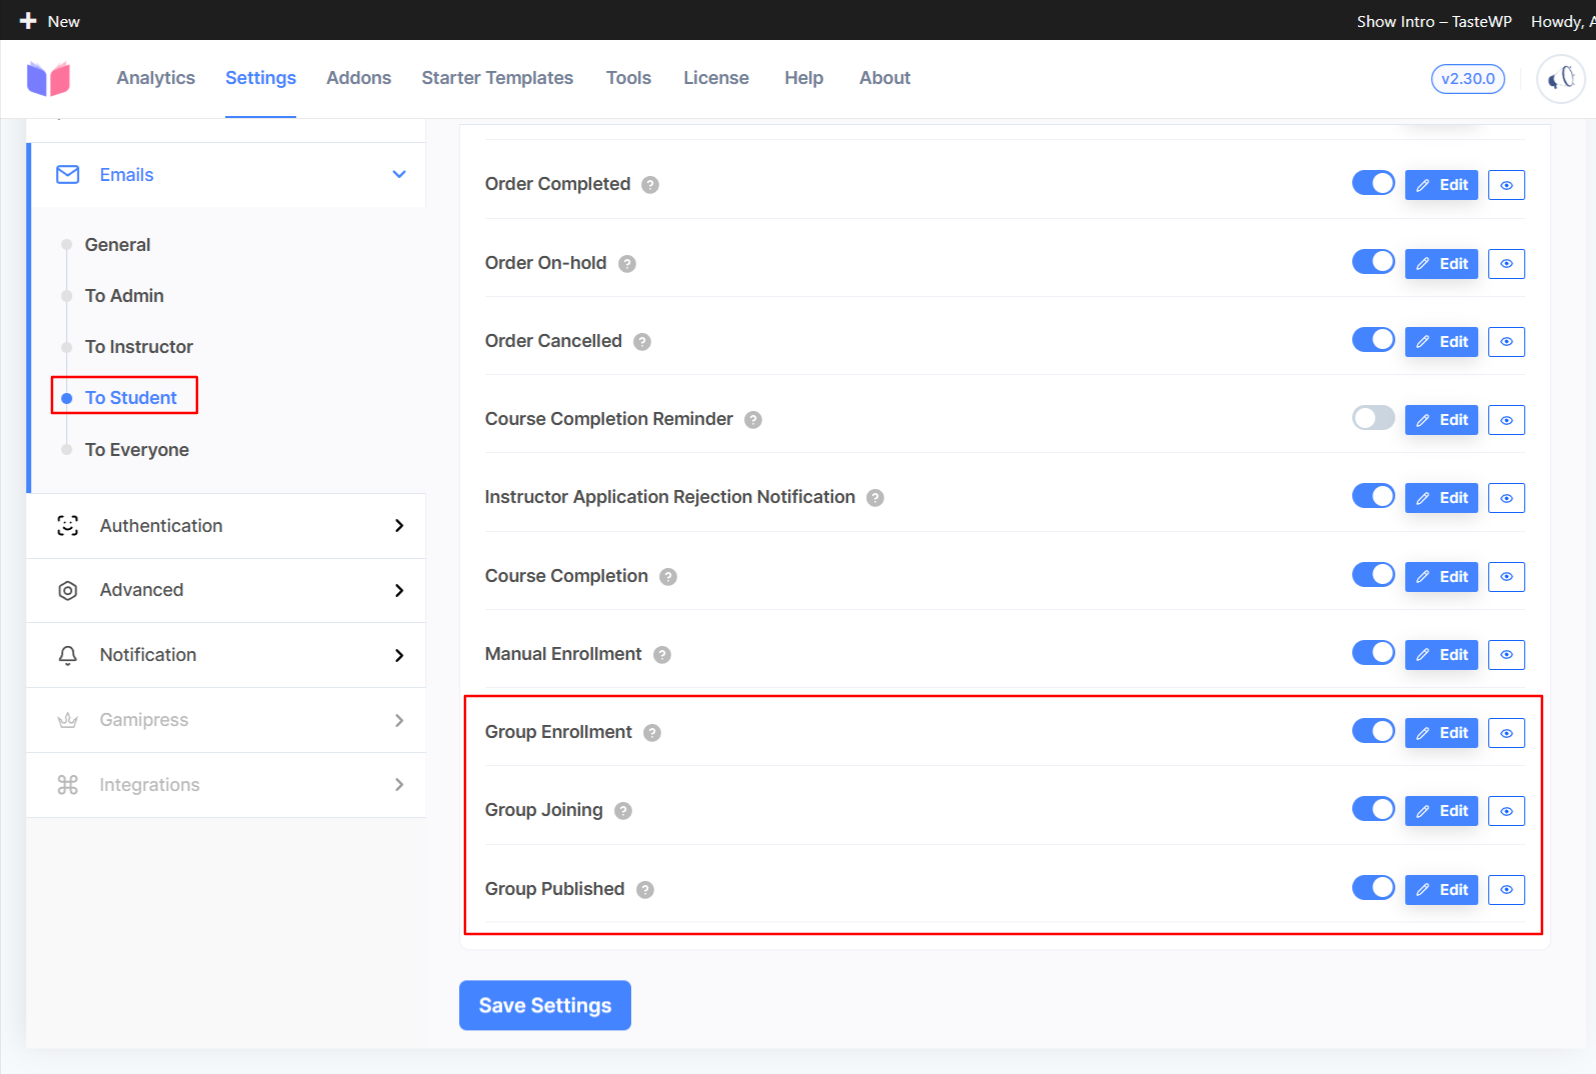
Email Notifications
Customize group-related emails from Masteriyo → Settings → Emails:
- Group Enrollment Email - Sent when someone joins a group
- Group Publish Email - Sent when admin approves a group
- Group Member Added Email - Sent to new members
- Group Member Removed Email - Sent when member is removed
Multiple Currency Support
You can offer different prices for different currencies:
Step 1: Enable Multiple Currency Addon
- Go to Masteriyo → Addons
- Enable Multiple Currency addon
- Go to Masteriyo → Settings → Currencies
- Add pricing zones with exchange rates
Step 2: Configure Currency for Group Pricing
- Edit your course
- In Settings tab, enable Multiple Currency
- For each currency/zone:
- Enable price calculation by exchange rate, OR
- Set prices manually for each pricing tier
- When setting manually, enter Regular Price, Sale Price, and configure all pricing tiers for that currency
Customers will see prices in their local currency and can select their preferred tier.
Plan Comparison
Free Plan
- Create 1 pricing tier only
- Fixed seats model only (e.g., "10 seats for $500")
- Single total price per tier (no per-seat or tiered pricing)
- Perfect for getting started with group sales
- Sell to teams and organizations
Paid Plans
- Create unlimited pricing tiers
- Use Fixed Seats (like Free) or Variable Seats model
- Use Per-Seat Pricing or Tiered Pricing with volume discounts
- Mix and match seat models and pricing models
- Full flexibility for enterprise sales
- Advanced B2B pricing strategies
Troubleshooting
Customers Can't See Multiple Tiers
- Verify you're on a paid plan (the Free plan shows only 1 tier)
- Check that "Sell to Groups" is enabled in course settings
- Ensure you've created and saved multiple pricing tiers
- Clear browser and WordPress caches
Price Not Calculating Correctly
- For tiered pricing: Verify ranges are continuous without gaps
- Check that min/max seats match your tier ranges
- Ensure there's no overlap between price tier ranges
- Test calculation manually: seats × per-seat price for that range
Customers Can't Complete Purchase
- Verify the Groups addon is active
- Check that selected tier is published/active
- Ensure seat selection is within allowed range
- Check for JavaScript errors in browser console
Legacy Group Pricing Not Showing
- Your old settings automatically migrated to a single tier
- Edit the course and you'll see the migrated tier
- You can now add more tiers or modify the existing one
Can't Add More Tiers
- Check your plan: the Free plan allows only 1 tier
- Upgrade to a paid plan for unlimited tiers
- Verify you're clicking "Add Pricing Tier" button
Migration from Legacy
If you were using the legacy single group pricing:
What Happens Automatically
Your existing group pricing data automatically converts to the new format:
- Old group price → First tier's regular price
- Old max group size → First tier's fixed seats
- Group name defaults to "Group"
What You Should Do
- Edit your course to review the migrated tier
- Optionally rename the tier (e.g., from "Group" to "Standard Team")
- Add more tiers to offer multiple options (Pro/Elite plans)
- Consider switching to variable seats or tiered pricing for more flexibility
Data Safety
- Your original data remains in the database
- Migration is non-destructive
- You can always view/edit the migrated tier
- Customer purchases remain unaffected
Frequently Asked Questions
Can I mix fixed and variable seats in one course?
Yes! You can create multiple tiers with different seat models. For example:
- Tier 1: Fixed 5 seats
- Tier 2: Variable 10-50 seats
- Tier 3: Variable 51-100 seats with tiered pricing
How many pricing tiers can I create?
- Free plan: 1 tier only
- Paid plans: Unlimited tiers
Can customers buy multiple tiers?
No. Customers select one tier per purchase. If they want more seats, they can make a separate purchase or choose a larger tier.
Do group members need individual accounts?
Yes. When the group creator adds members by email, those members receive invitations to create accounts or log in to access the course.
Can I change pricing after orders are placed?
Yes, you can update pricing tiers anytime. However, existing orders/groups maintain their original pricing. Only new purchases use the updated pricing.
Does this work with payment gateways?
Yes! Multiple group pricing works with all Masteriyo-supported payment gateways including PayPal, Stripe, and offline payments.
How do I offer free trials or coupons for groups?
Use the Coupons addon to create discount codes that work with group purchases. Apply the coupon at checkout.
Can group leaders add members immediately after purchase?
No. Group leaders must wait for admin approval. After purchasing, the group has "Draft" status and members cannot be added until an admin changes the order status to "Completed."
What happens if a group leader removes a member?
Depending on your settings ("Deactivate Enrollment on Member Change"), the removed member may lose access to group courses. They will also receive a notification email if configured.
Can I remove myself from my own group?
No. The group leader (purchaser) cannot remove themselves from the group. Only admins can change group ownership.
Where do group leaders manage their groups?
Group leaders access their groups through Account → Groups in the sidebar menu. This menu item only appears for users who have purchased at least one group course.
Can group leaders see other people's groups?
No. Group leaders can only view and manage groups they've created/purchased. Only admins can see all groups.
What if I want to add more members than my purchased seats?
You cannot exceed the seat limit of your purchased tier. You would need to purchase another group or contact the admin about upgrading your existing group.
Do group members get enrolled automatically?
Yes. When a group leader adds a member's email and saves, that member receives an invitation email. Once they create an account (or log in), they're automatically enrolled in all courses associated with that group.
Can group leaders delete their groups?
Yes. Group leaders can delete groups they own from the Groups page. This action is permanent and will deactivate all member enrollments (if settings configured).
Was this article helpful to you?
Give us Rating
Last edited on July 22, 2026.
Edit this page