Elementor Integration
Add Masteriyo widgets to Elementor — course list, carousels, and single course widgets — plus custom course archive and single course page templates.
Elementor is a popular page builder plugin for WordPress that allows users to design and customize their website without any coding knowledge. When integrated into Masteriyo, it can provide you with the tools to create engaging and interactive e-learning content for your students.
Requires
- Elementor to be installed and activated.
- Elementor Integration add-on activated.
Setup and Configuration
Once you have installed the Elementor plugin and activated the Elementor Integration add-on from Masteriyo, follow the steps below.
- Go to Pages > Add New

- Provide the name for the page and click on Edit with Elementor
Now, you will see the Elementor page builder window. Here, you can find the Elements section on the left-hand side. You can find the course elements under the Masteriyo accordion.
You will find the following elements under the Masteriyo section:
- Course List
- Course Category
- Courses Toolbar
- Course Carousel
- Category Carousel
- Course Bundle List [Pro]
- Course Bundle Carousel [Pro]
Single-course widgets (Title, Price, Enroll Button, Curriculum, etc.) appear in a separate Masteriyo - Single Course panel category and are only visible in the Elementor panel when editing a Masteriyo Single Course Page template.
Basic Configuration
Course List
To add the course list, drag this element from the left-hand side to the widget area. Now, you can configure this element as per your need. It has the following sections.
Course List — General
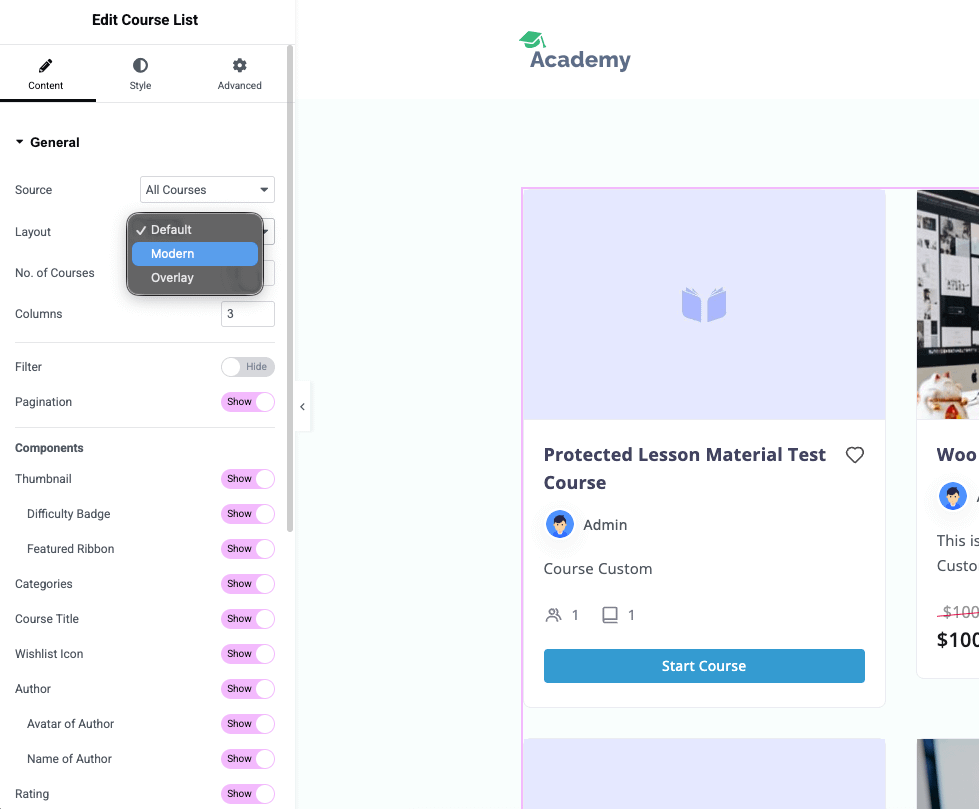
Click on the Course List element that you have just dragged into the widget and you will see the options to set under the General tab on the right sidebar.
- Layout – Choose the visual style of the course cards. Available options:
- Default – The standard card layout.
- Modern – A modern card style with a refreshed design.
- Overlay – Course image fills the card with text overlaid on top.
- No. of Courses – Total number of courses to appear on this page.
- Columns – Number of columns per row.
- Show Filter – Toggle the built-in filter bar above the course list. Only available in the Default layout.
- Show Pagination – Toggle built-in pagination below the course list.
- Thumbnail – Settings related to the thumbnail. Enabling this will show two more options:
- Difficulty Badge
- Featured Ribbon
- Categories – Show/hide the name of the category.
- Course Title – Show/hide the title of the courses.
- Wishlist Icon – Show/hide the wishlist icon on the course cards. (Requires the Wishlist add-on to be active.)
- Author – Show/hide the author name. Enabling this will show two more options:
- Avatar of Author
- Name of the Author
- Rating – Show/hide the course's ratings.
- Highlights/Description – Show/hide the course's description.
- Meta Data – Show/hide the section containing information on number of students, course hours, etc. Enabling this option will show three more options:
- Course Duration
- Students Count
- Lesson Count
- Footer – Show/hide the footer section on the course card that shows pricing and the purchase button.
Course List — Filter
In this section, you will find two tabs. You can either include or exclude options based on these tabs. Toggle between Include or Exclude as per your requirements. This section consists of the following options.
- Categories – Select the list of categories to include/exclude on the course cards.
- Instructor – Select the instructors from the list to include/exclude on the course card.
Course List — Sorting
As the name suggests, this section helps you sort the courses in ascending or descending order by date, title, price, or rating.
Course Category
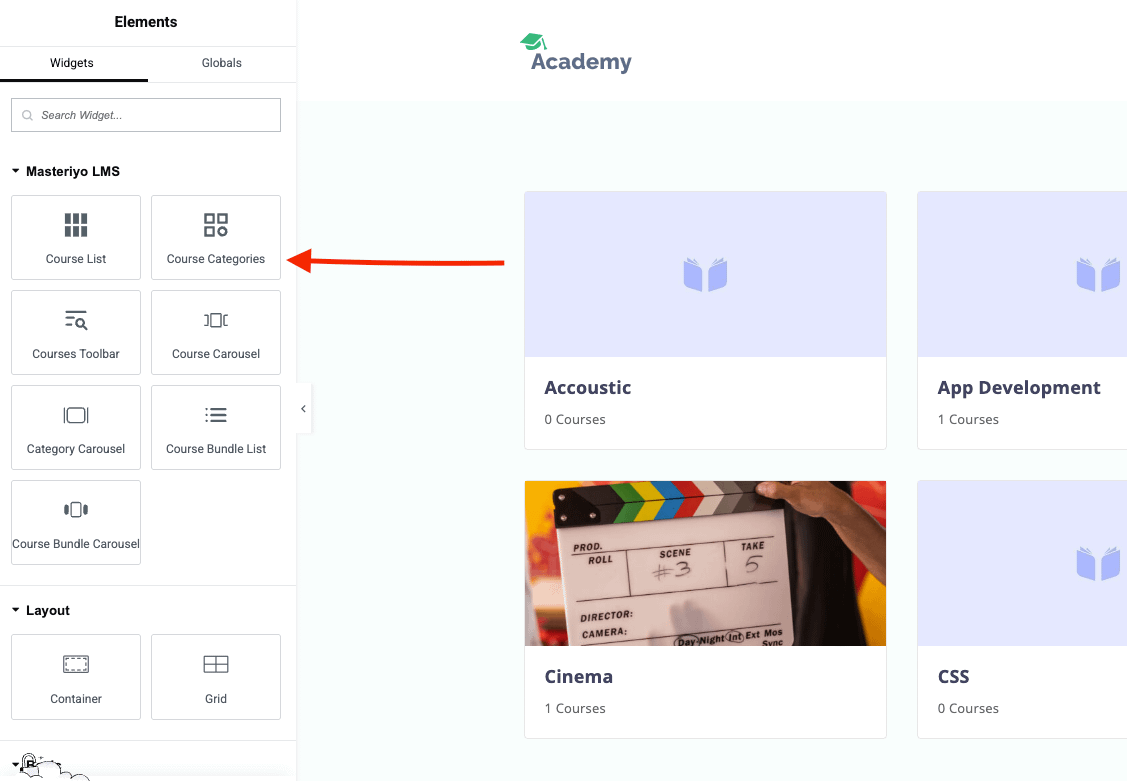
To add the course category, drag this element from the left-hand side to the widget area. Now, you can configure this element as per your need. It has the following sections.
Course Category — General
Click on the Course Category element that you have just dragged into the widget and you will see the options to set under the General tab on the right sidebar.
- No. of Categories – Set the total number of categories to be shown on the page.
- Columns – Select the total number of columns.
- Include Sub-Categories – Show/hide any sub-categories (categories inside a parent category).
- Thumbnail – Show/hide the course's thumbnail image.
- Details – Enable this option to include details like Title, Courses Count, etc.
Course Category — Sorting
As the name suggests, this section helps you sort the course categories in ascending or descending order by date, title, or course count.
Course Carousel
The Course Carousel widget displays courses in a scrollable slider. To add it, drag the element from the Masteriyo panel into your layout. It has the following sections.
Course Carousel — General
Click on the Course Carousel element that you have just dragged into the widget and you will see the options to set under the General tab on the right sidebar.
- Source – Choose which courses to display: All Courses or Related Courses (courses related to the current course, useful on single course pages).
- Limit – Total number of courses to load in the carousel.
- Layout – Choose the visual style of the carousel cards:
- Default – The standard card layout.
- Modern – A modern card style.
- Overlay – Course image fills the card with text overlaid on top.
- Thumbnail – Show/hide the course thumbnail. Enabling this will show two more options (Default layout only):
- Difficulty Badge
- Featured Ribbon
- Categories – Show/hide the category label (Default and Modern layouts only).
- Course Title – Show/hide the title of the courses.
- Wishlist Icon – Show/hide the wishlist icon on the course cards.
- Author – Show/hide the author (Default and Modern layouts only). Enabling this will show two more options:
- Avatar of Author
- Name of Author (Default layout only)
- Rating – Show/hide the course ratings.
- Highlights / Description – Show/hide the course description (Default layout only).
- Meta Data – Show/hide the section containing number of students, course hours, etc. (Default layout only). Enabling this will show three more options:
- Course Duration
- Students Count
- Lessons Count
- Footer – Show/hide the footer section with pricing and enroll button (Default and Modern layouts only). Enabling this will show two more options:
- Price
- Enroll Button
Course Carousel — Carousel Settings
- Arrows – Show/hide the previous/next navigation arrows.
- Dots – Show/hide the pagination dots below the carousel.
- Transition Duration – Speed of the slide transition in milliseconds.
- Centered Slides – Center the active slide in the viewport.
- Smooth Scrolling – Enable smooth mouse wheel scrolling.
- Auto Play – Automatically advance slides. Enabling this will show:
- Auto Play Speed – Delay between auto-advances in milliseconds.
- Reverse Direction – Play the carousel in reverse direction.
- Infinite Loop – Loop the carousel continuously.
- Pause on Hover – Pause auto-play when the user hovers over the carousel.
- Rewind – Rewind to the first slide after reaching the last (cannot be used together with Infinite Loop).
- Slides Per View – Number of course cards visible at once (supports responsive breakpoints for desktop, tablet, and mobile).
- Space Between Slides – Gap between cards in pixels (supports responsive breakpoints).
Category Carousel
The Category Carousel widget displays course categories in a scrollable slider. To add it, drag the element from the Masteriyo panel into your layout. It has the following sections.
Category Carousel — General
Click on the Category Carousel element that you have just dragged into the widget and you will see the options to set under the General tab on the right sidebar.
- Limit – Total number of categories to load in the carousel.
- Include Sub-Categories – Show/hide sub-categories (categories inside a parent category).
- Thumbnail – Show/hide the category thumbnail image.
- Details – Show/hide the category detail block. Enabling this will show two more options:
- Title – Show/hide the category name.
- Courses Count – Show/hide the number of courses in the category.
Category Carousel — Carousel Settings
- Arrows – Show/hide the previous/next navigation arrows.
- Dots – Show/hide the pagination dots below the carousel.
- Transition Duration – Speed of the slide transition in milliseconds.
- Centered Slides – Center the active slide in the viewport.
- Smooth Scrolling – Enable smooth mouse wheel scrolling.
- Auto Play – Automatically advance slides. Enabling this will show:
- Auto Play Speed – Delay between auto-advances in milliseconds.
- Reverse Direction – Play the carousel in reverse direction.
- Infinite Loop – Loop the carousel continuously.
- Pause on Hover – Pause auto-play when the user hovers over the carousel.
- Rewind – Rewind to the first slide after reaching the last (cannot be used together with Infinite Loop).
- Slides Per View – Number of category cards visible at once (supports responsive breakpoints for desktop, tablet, and mobile).
- Space Between Slides – Gap between cards in pixels (supports responsive breakpoints).
Course Bundle List Pro
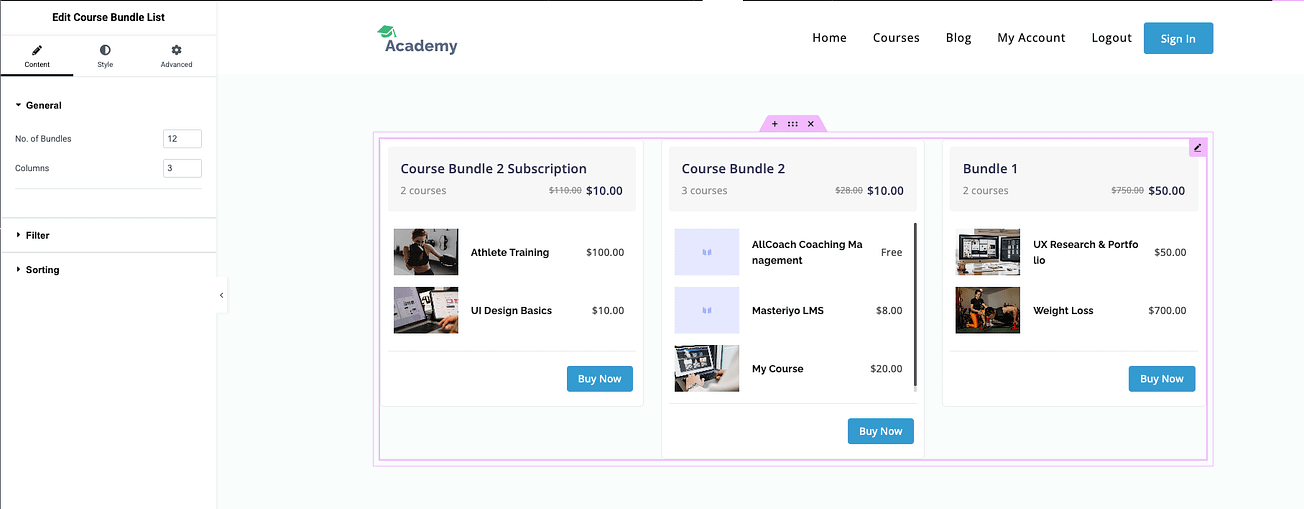
The Course Bundle List widget displays your course bundles in a grid. To add it, drag the element from the Masteriyo panel into your layout. It has the following sections.
Course Bundle List — General
Click on the Course Bundle List element that you have just dragged into the widget and you will see the options to set under the General tab on the right sidebar.
- No. of Bundles – Total number of bundles to appear on this page.
- Columns – Number of columns per row.
Course Bundle List — Filter
In this section, you will find two tabs. You can either include or exclude options based on these tabs. Toggle between Include or Exclude as per your requirements. This section consists of the following options.
- Authors – Select instructors to include/exclude from the bundle listing.
Course Bundle List — Sorting
As the name suggests, this section helps you sort the bundles in ascending or descending order by date, title, price, etc.
Course Bundle Carousel Pro
The Course Bundle Carousel widget displays course bundles in a scrollable slider. To add it, drag the element from the Masteriyo panel into your layout. It has the following sections.
Course Bundle Carousel — General
Click on the Course Bundle Carousel element that you have just dragged into the widget and you will see the options to set under the General tab on the right sidebar.
- Limit – Total number of bundles to load in the carousel.
Course Bundle Carousel — Carousel Settings
- Arrows – Show/hide the previous/next navigation arrows.
- Dots – Show/hide the pagination dots below the carousel.
- Transition Duration – Speed of the slide transition in milliseconds.
- Centered Slides – Center the active slide in the viewport.
- Smooth Scrolling – Enable smooth mouse wheel scrolling.
- Auto Play – Automatically advance slides. Enabling this will show:
- Auto Play Speed – Delay between auto-advances in milliseconds.
- Reverse Direction – Play the carousel in reverse direction.
- Infinite Loop – Loop the carousel continuously.
- Pause on Hover – Pause auto-play when the user hovers over the carousel.
- Rewind – Rewind to the first slide after reaching the last (cannot be used together with Infinite Loop).
- Slides Per View – Number of bundle cards visible at once (supports responsive breakpoints for desktop, tablet, and mobile).
- Space Between Slides – Gap between cards in pixels (supports responsive breakpoints).
Courses Toolbar
The Courses Toolbar widget provides a dedicated toolbar to let visitors search, sort, and switch the view mode of the course listing on the same page. It supersedes the older Course Search Form widget.
To add it, drag the Courses Toolbar element from the Masteriyo panel into your layout alongside a Course List widget. It has the following controls:
Courses Toolbar — General
- Show Search – Toggle the search input field.
- Show Sorting – Toggle the sort dropdown. Enabling this reveals individual sort options to show or hide.
- Show View Mode – Toggle the grid/list view switcher. Only applies when the Course List widget is set to the Default layout.
Templates Creation
You can create templates with Elementor for the single course page and the course archive page. Follow the instructions below.
- Go to Templates > Add New
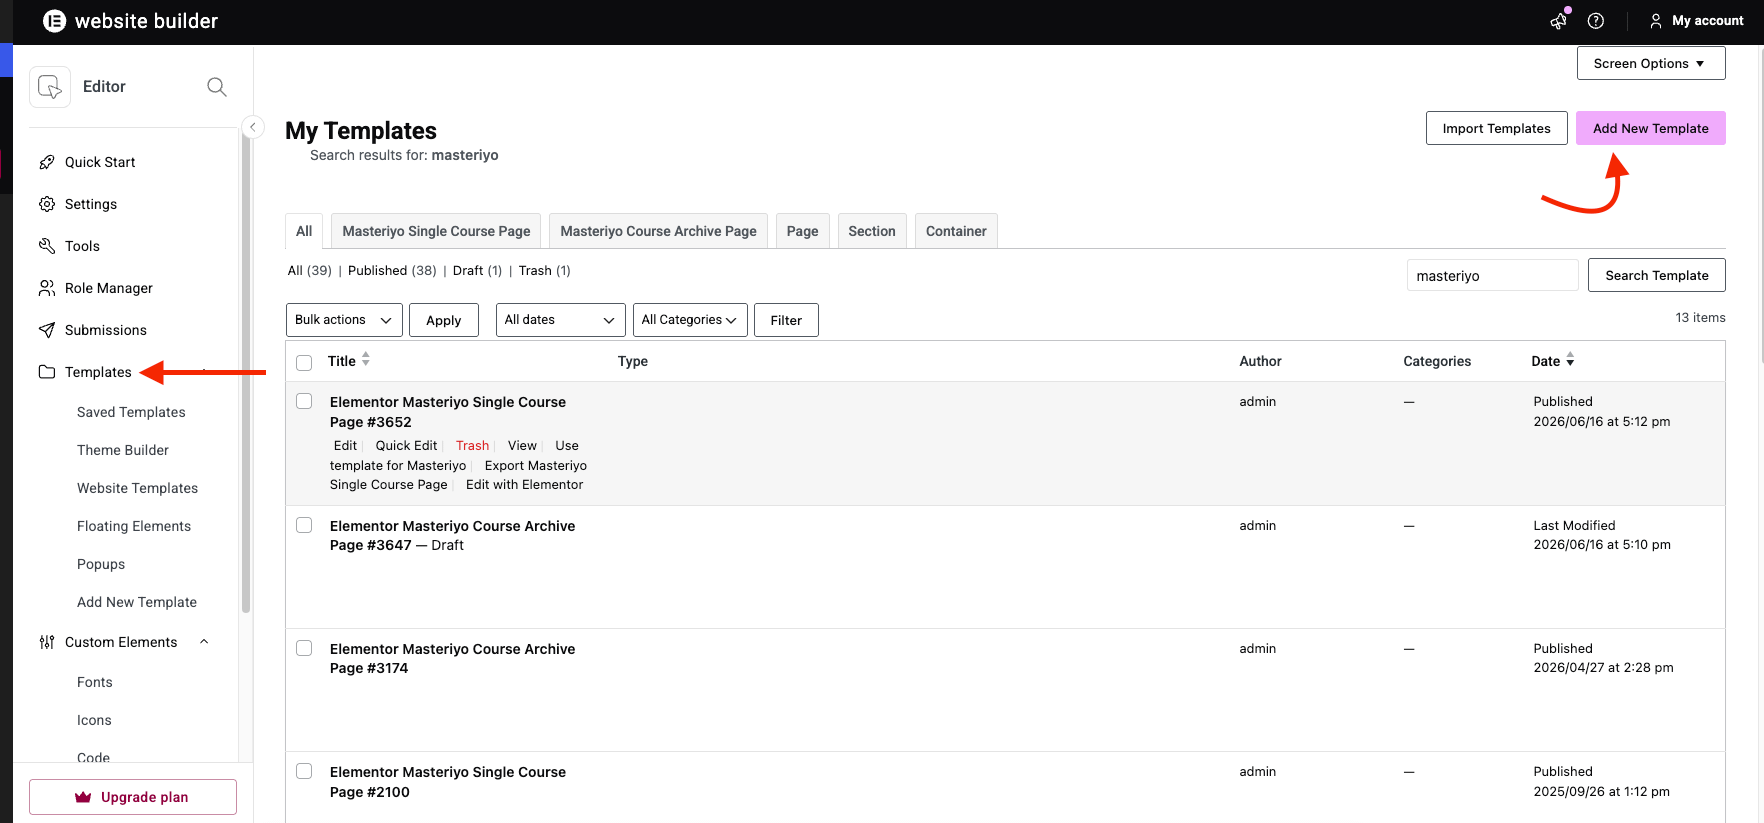
You will see the following window to create a template. You will have two options for Masteriyo:
- Masteriyo Course Archive Page
- Masteriyo Single Course Page
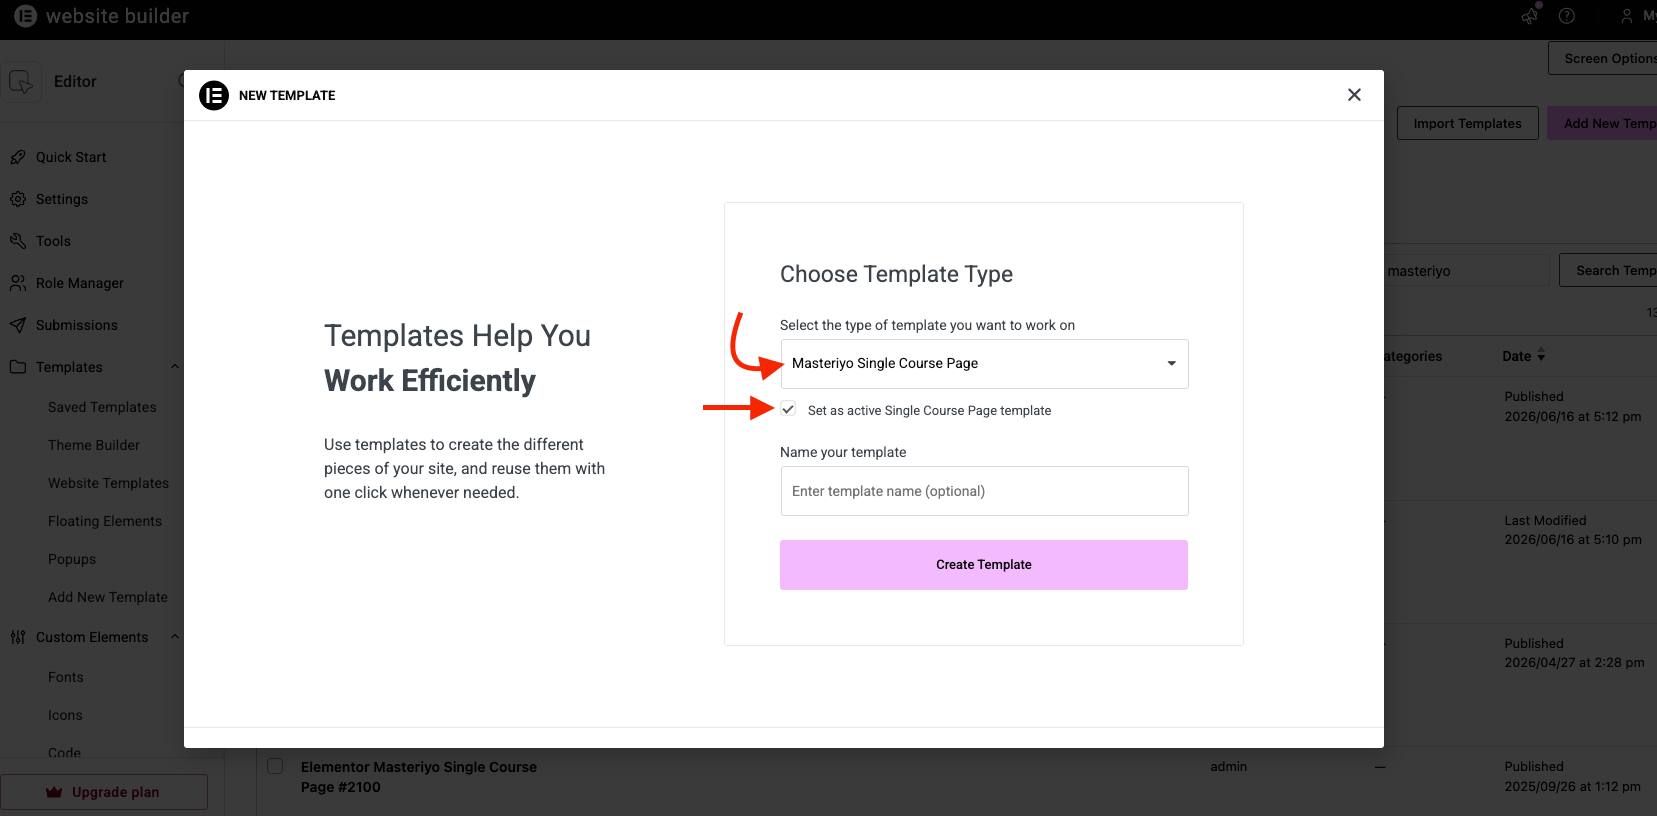
When creating a new template you will also see a Set as active template checkbox. Enabling this will automatically apply the template to the respective page (single course or archive) as soon as you save it, without needing to visit the Template Settings separately.
Masteriyo Single Course Page
Select Masteriyo Single Course Page as the type of the template and provide a suitable name. You can either import one of the default demo layouts or create the template from scratch.
Masteriyo Single Course Page — Default Demo
If you want to import a default demo, click on the Import button on the top-right side of the screen.
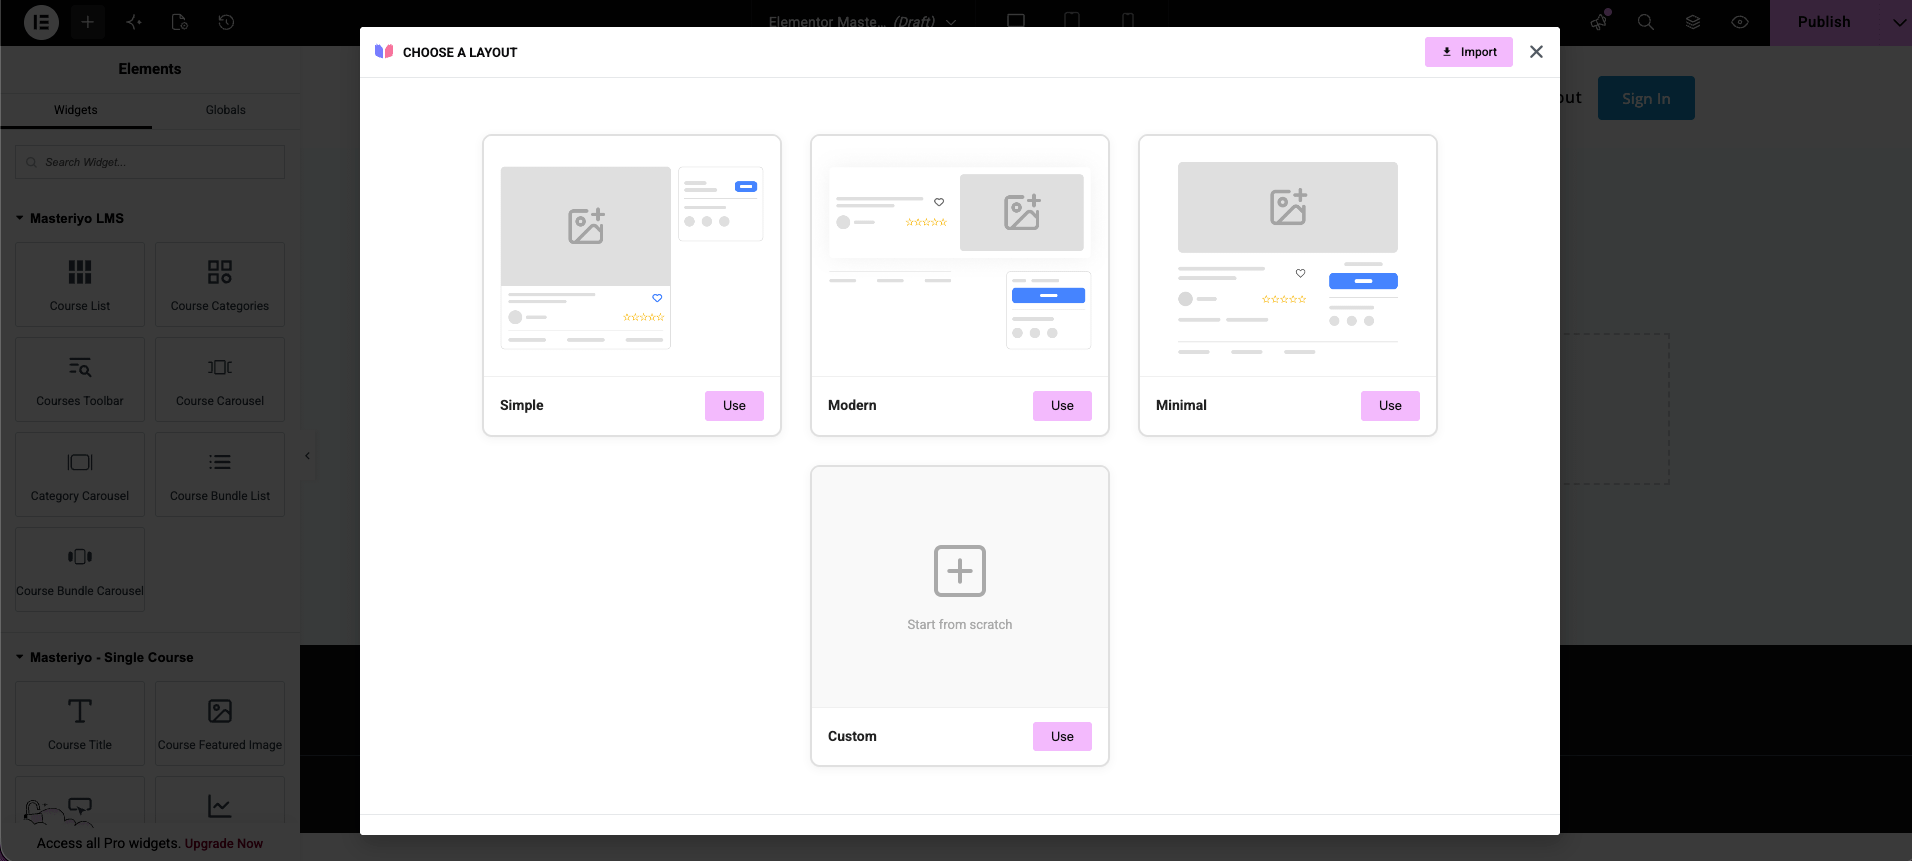
Masteriyo provides three ready-made single-course layout starters:
- Default – The classic layout.
- Modern – A refreshed, full-width design.
- Minimal – A stripped-down layout focused on content.
Once you have imported a layout, you can customize the look of each section via the Elementor options.
Masteriyo Single Course Page — Build From Scratch
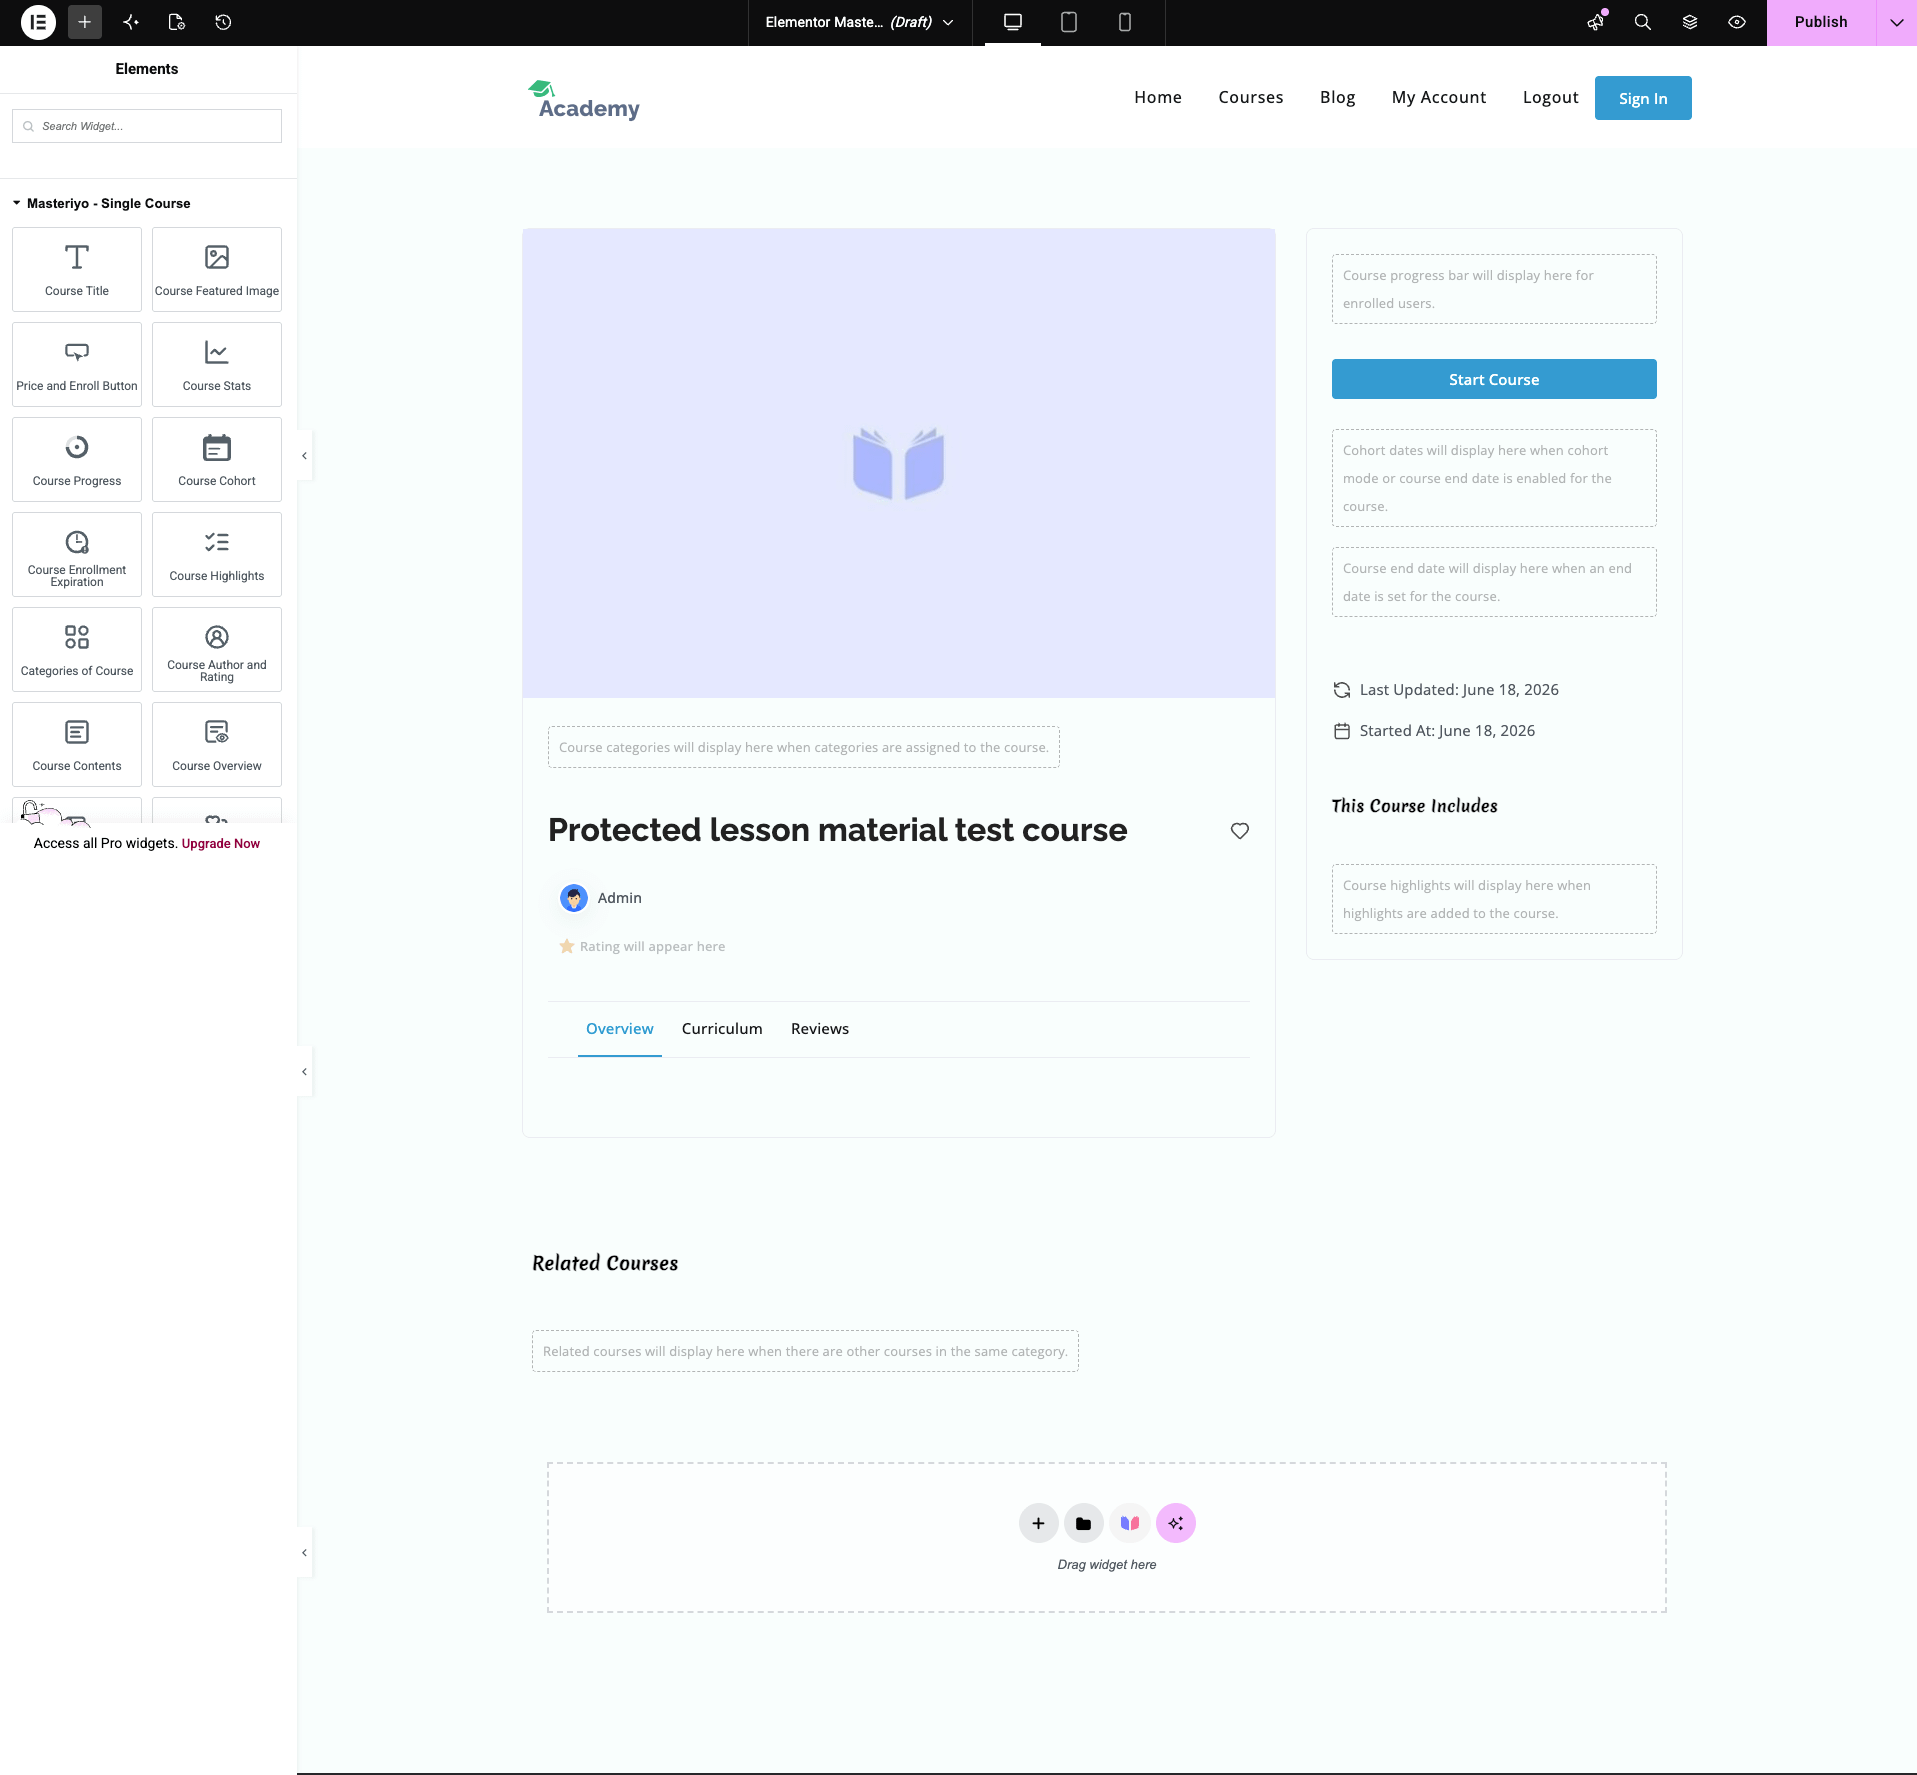
You can ignore the demo import and build the single course page from scratch.
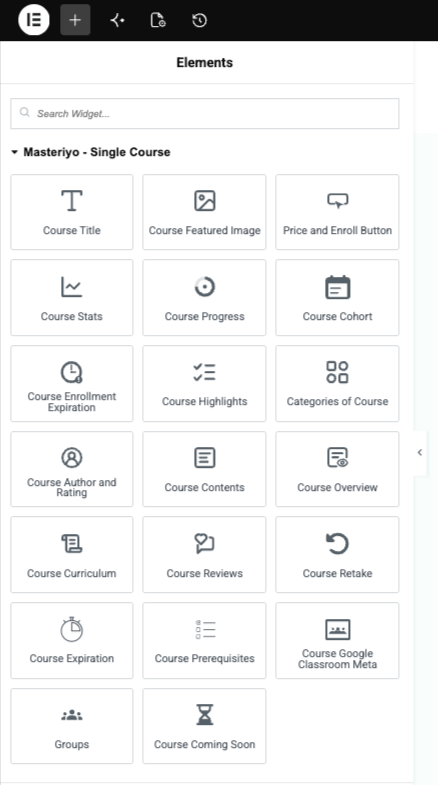
Drag and drop the Masteriyo LMS widgets into your layout. The available single-course widgets are:
- Course Title – Displays the course title.
- Course Author – Shows the author's name and avatar.
- Course Featured Image – Renders the course thumbnail.
- Course Overview – The course summary/overview.
- Course Curriculum – Shows the contents of the course (lessons, quizzes, etc.).
- Course Review – Displays reviews collected by the course.
- Course Contents – A collective widget combining Overview, Curriculum, and Review.
- Course Highlights – Lists the course highlights.
- Course Price – Shows the course price.
- Course Rating – Displays the average rating.
- Course Enroll Button – The enroll/buy button.
- Course Stats – Shows student count, lesson count, and duration.
- Course Progress – Displays the enrolled student's progress bar.
- Course Expiration Info – Shows the course end date/access window for the course.
- Course Enrollment Expiration – Displays a countdown to the enrolled student's access expiry. [Pro]
- Course Cohort – Shows cohort dates when cohort mode or a course end date is enabled. [Pro]
- Course Categories – Lists the categories the course belongs to.
- Course Retake – Shows the retake button once a course is completed.
- Course Coming Soon – Displays a coming-soon notice for unpublished courses.
- Social Share – Adds social sharing buttons to the course page. [Pro]
- Course Prerequisites – Lists the prerequisite courses. [Pro]
- Group Course – Displays group enrollment information. (Requires the free Group Courses add-on.)
- Google Classroom – Shows Google Classroom integration details. (Requires the free Google Classroom Integration add-on.)
Single-course widgets are only visible in the Elementor widget panel when you are editing a Masteriyo Single Course Page template. They are hidden on archive and general page templates to keep the panel clean.
Masteriyo Course Archive Page
Select Masteriyo Course Archive Page as the type of the template and provide a suitable name. You can either import one of the default demo layouts or create the template from scratch.
Masteriyo Course Archive Page — Default Demo
If you want to import a default demo, click on the Import button on the top-right side of the screen.
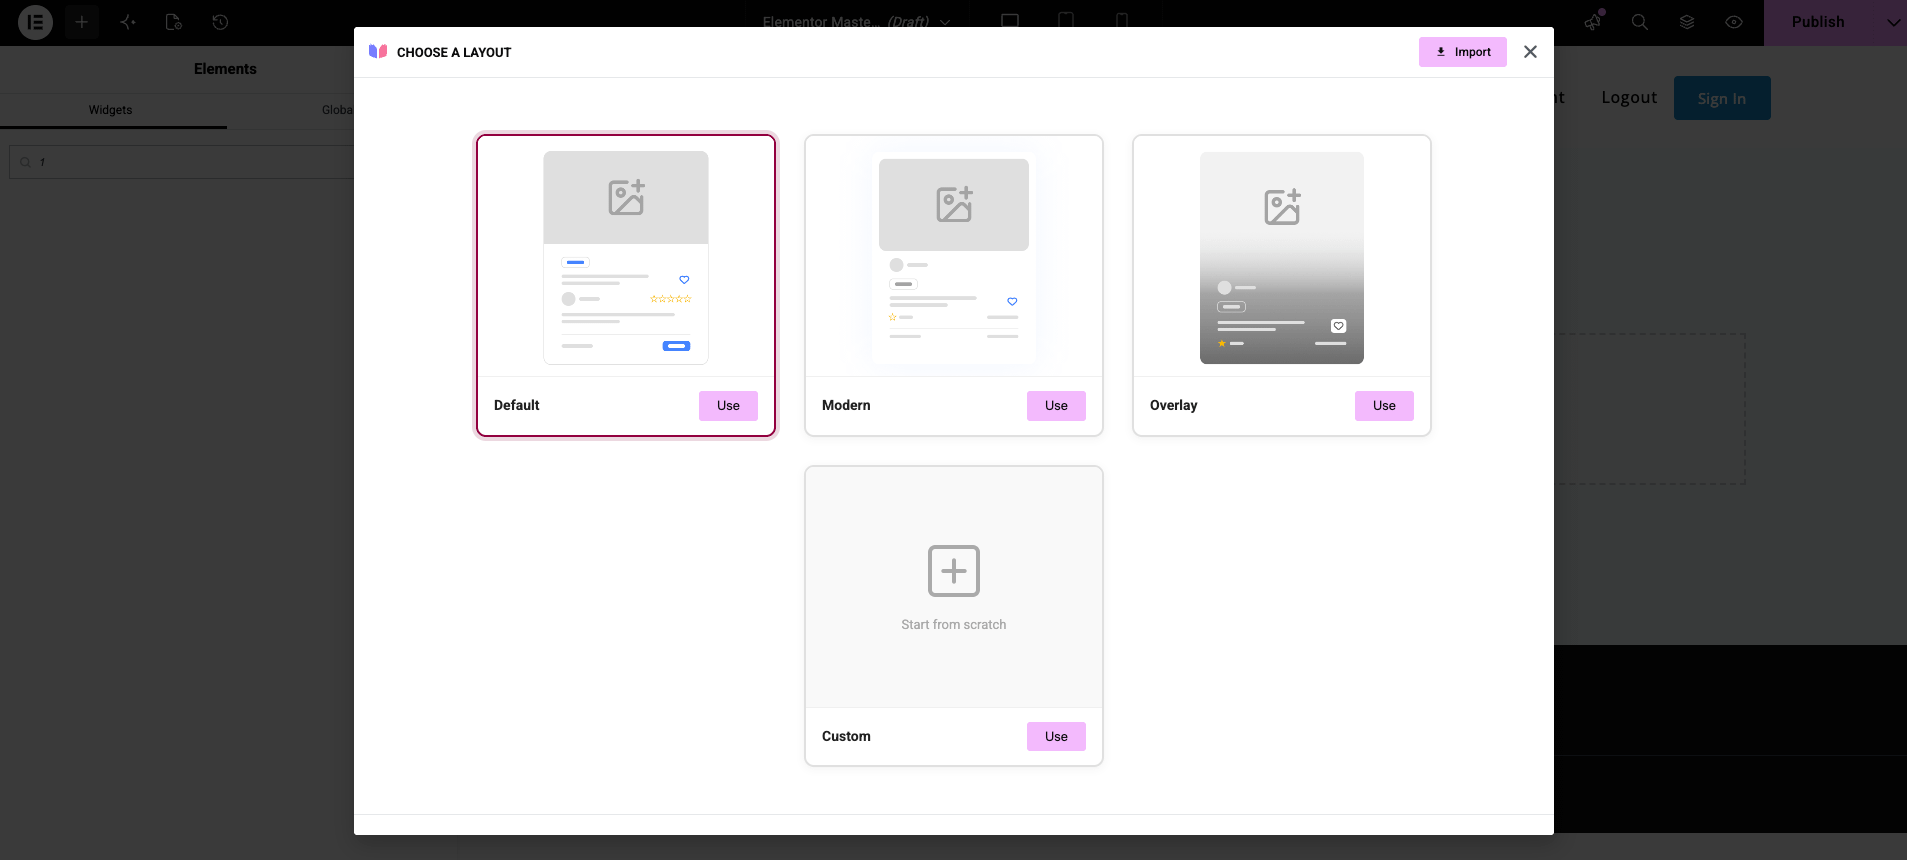
Masteriyo provides three ready-made archive layout starters and one blank option:
- Default – The standard course archive layout.
- Modern – A modern grid layout with a refreshed card design.
- Overlay – Cards with overlay-style image presentation.
- Custom – Start from scratch with a blank canvas.
Once you have imported the layout, you can customize the look of each section via the Elementor options.
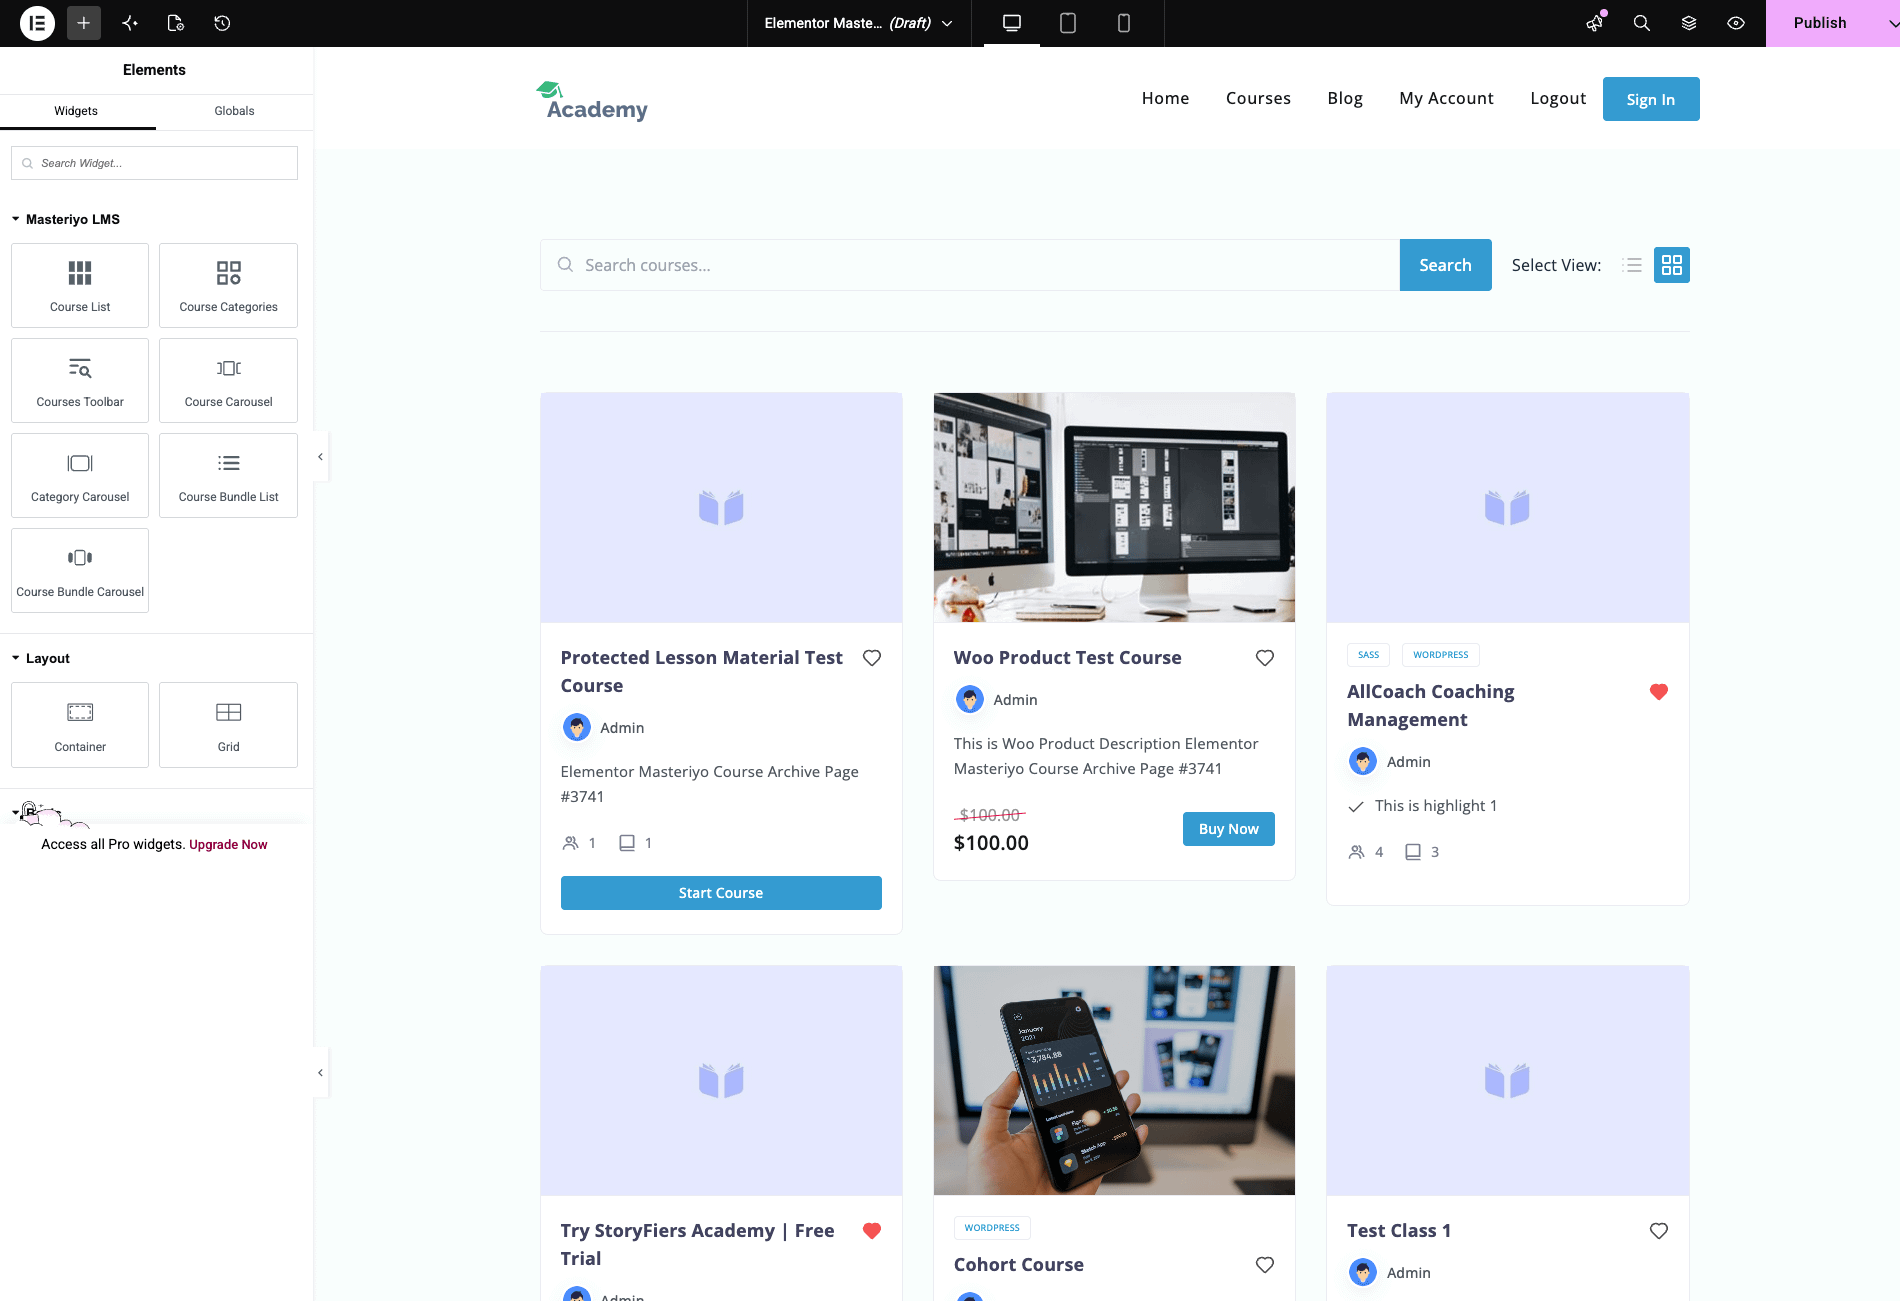
Masteriyo Course Archive Page — Build From Scratch
You can ignore the demo import and build the course archive page from scratch.
Drag and drop the Masteriyo LMS widgets into your layout. Use the Course List widget (with its built-in Filter and Pagination toggles) and optionally the Courses Toolbar widget to add search, sorting, and view-mode switching.
Template Selection
Once you have created the single course and archive page templates, you can select the template from the following location.
Location: Masteriyo > Courses > Settings Tab > Course Page / Single Course Page > Template
When creating a template, if you had checked the Set as active template checkbox, the template will be automatically assigned and enabled for the respective page — no further action is needed.
If you did not check that option, you will need to manually assign the template. Enable Custom Template by toggling on the given button. Now, select the template you have created for the respective pages via their respective settings.
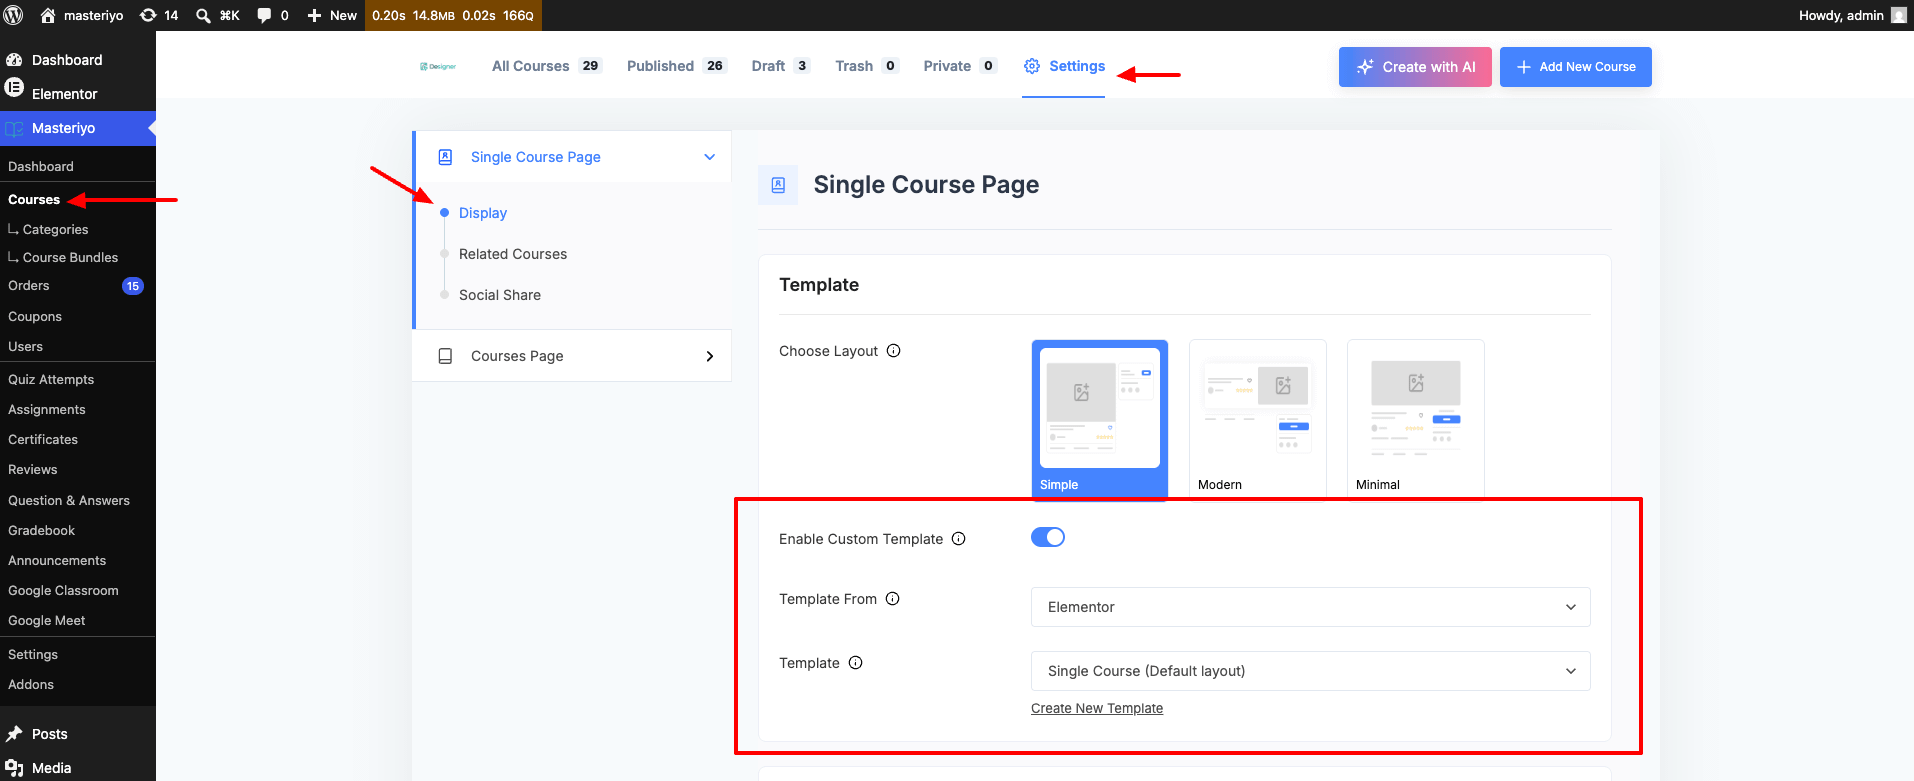
Hit Save Settings and the template will be applied to the selected page.
Was this article helpful to you?
Give us Rating
Last edited on July 28, 2026.
Edit this page