Stripe Payment Gateway
Learn how to set up the Stripe Payment Gateway for your Masteriyo LMS. Stripe allows you to securely accept payments via major credit cards, debit cards, and local payment methods.
Prerequisites:
- Masteriyo LMS: Free plan or higher.
- SSL Certificate: Your site must be running on HTTPS to process secure payments.
- Stripe Account: A registered account at Stripe.com.
Before You Start
- Backup Your Site: It is a best practice to have a recent backup of your site before adding new payment integrations.
- Check Currencies: Ensure your Masteriyo store currency matches your Stripe account settings to avoid transaction errors.
Getting started with Stripe
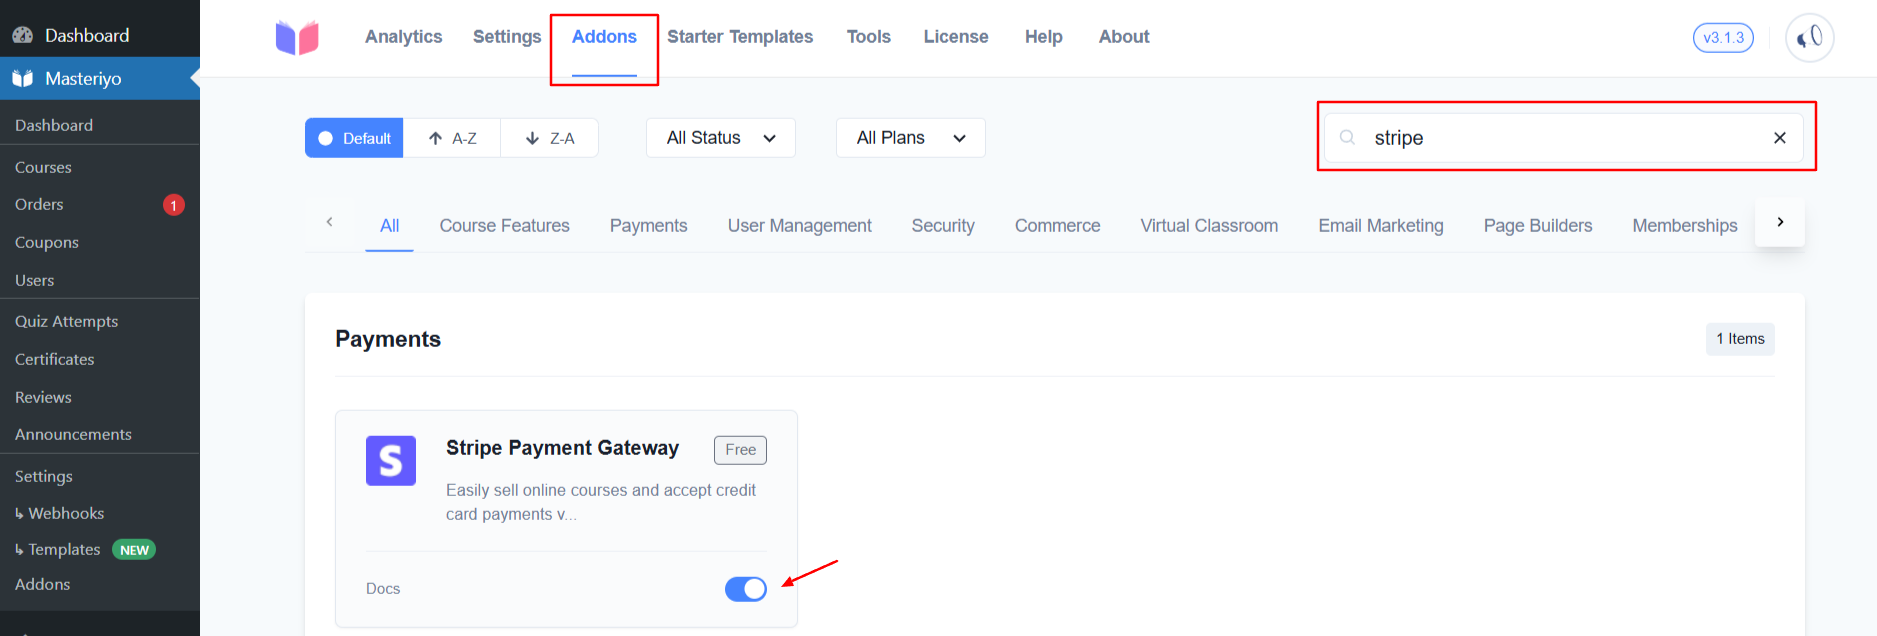
Step 1: Activate the Stripe Addon
To use Stripe, you must first enable the addon within your Masteriyo dashboard.
- Go to Masteriyo > Settings > Addons.
- Search for Stripe using the search bar.
- Once found, toggle the switch to enable the addon.
Step 2: Connect Masteriyo with Stripe
Masteriyo offers a "one-click" connection to make the setup process as simple as possible.
- Go to your WordPress dashboard and navigate to Masteriyo > Settings.
- Click on the Payment tab and select Stripe.
- Click the Connect with Stripe button.
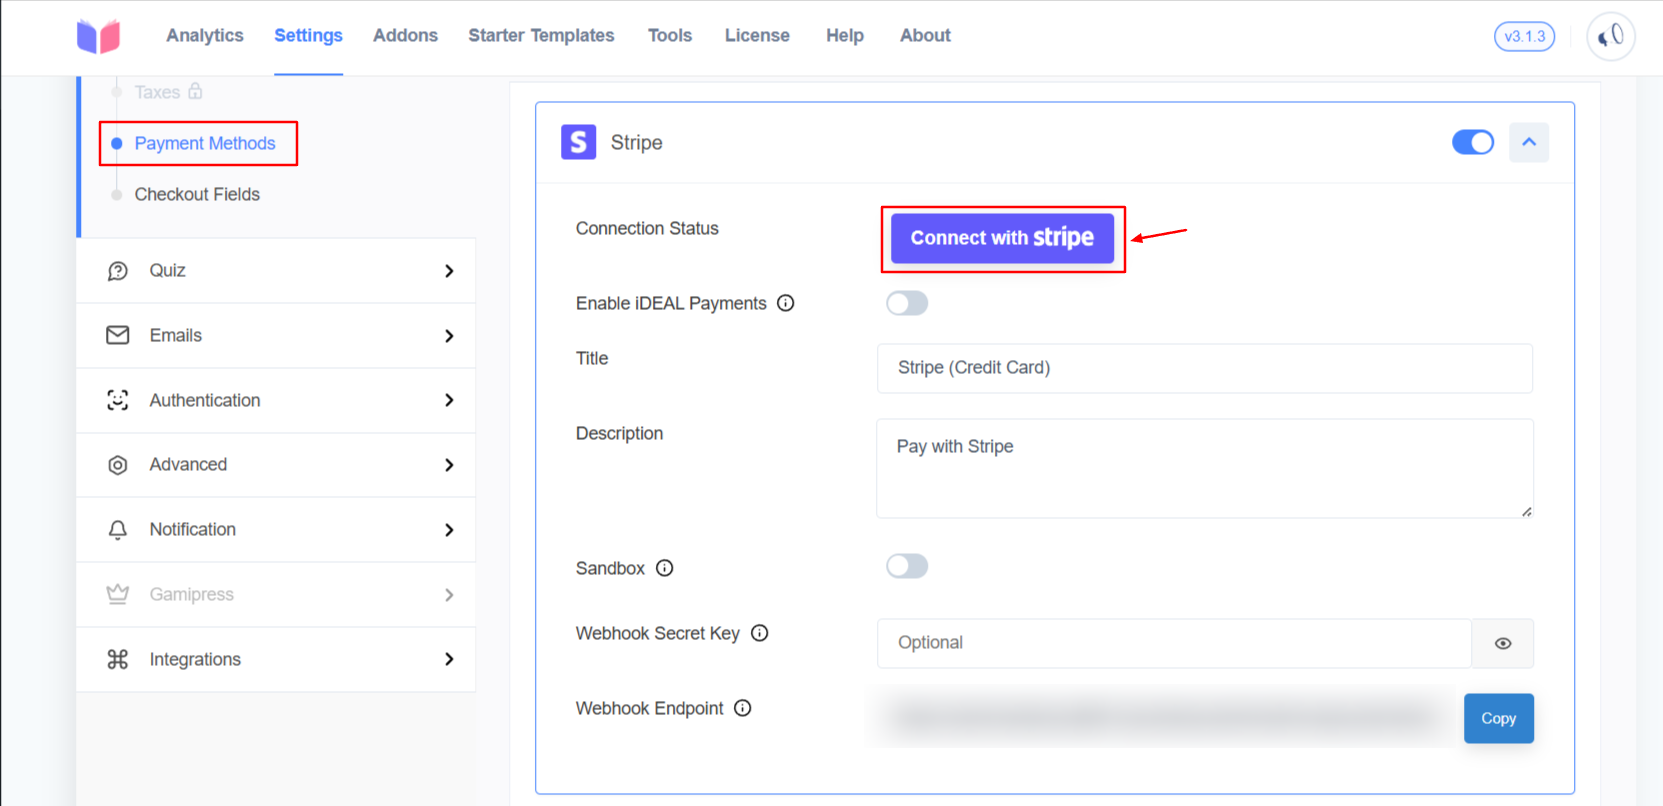
- You will be redirected to the Stripe login page. Enter your Stripe username and password.
- Next, you need to fill up all the personal details and other details such as (business
details, bank details, public details, etc) to proceed.
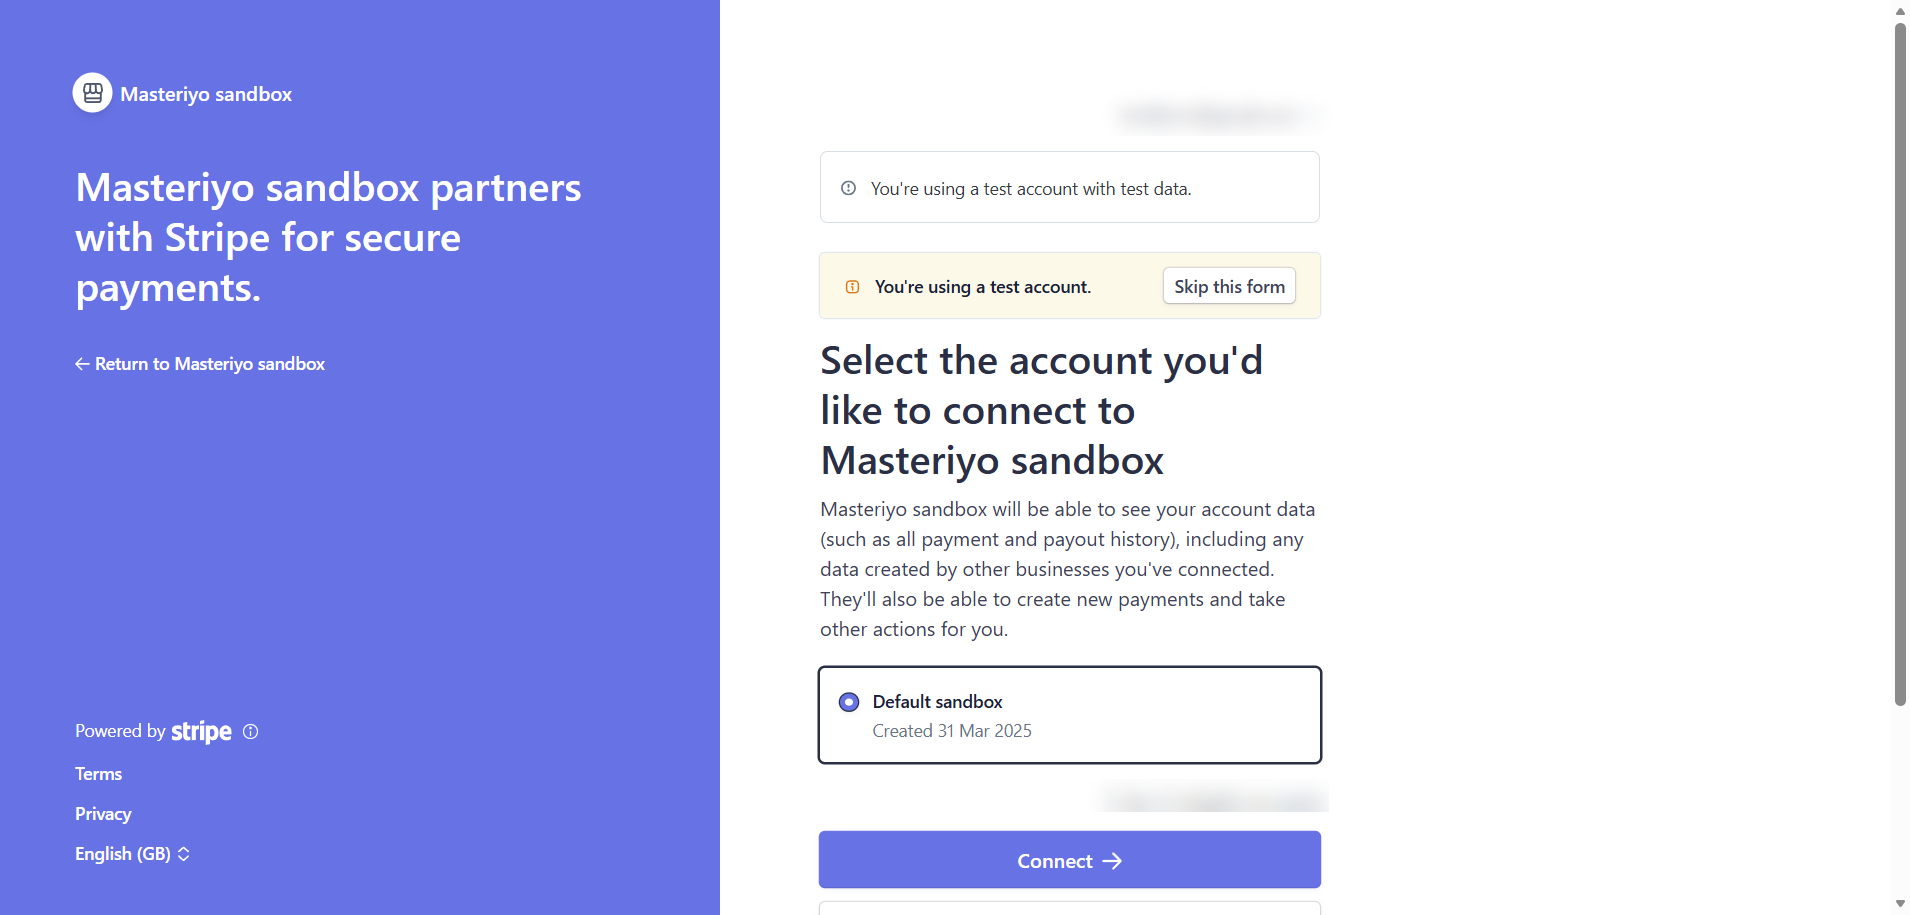
- Once you authorize the connection, you will be automatically redirected back to your Masteriyo dashboard.
- Click Save Settings to confirm the connection.
Step 3: Configure Stripe Options
After connecting, you can customize the following settings under Masteriyo > Settings > Payment > Stripe:
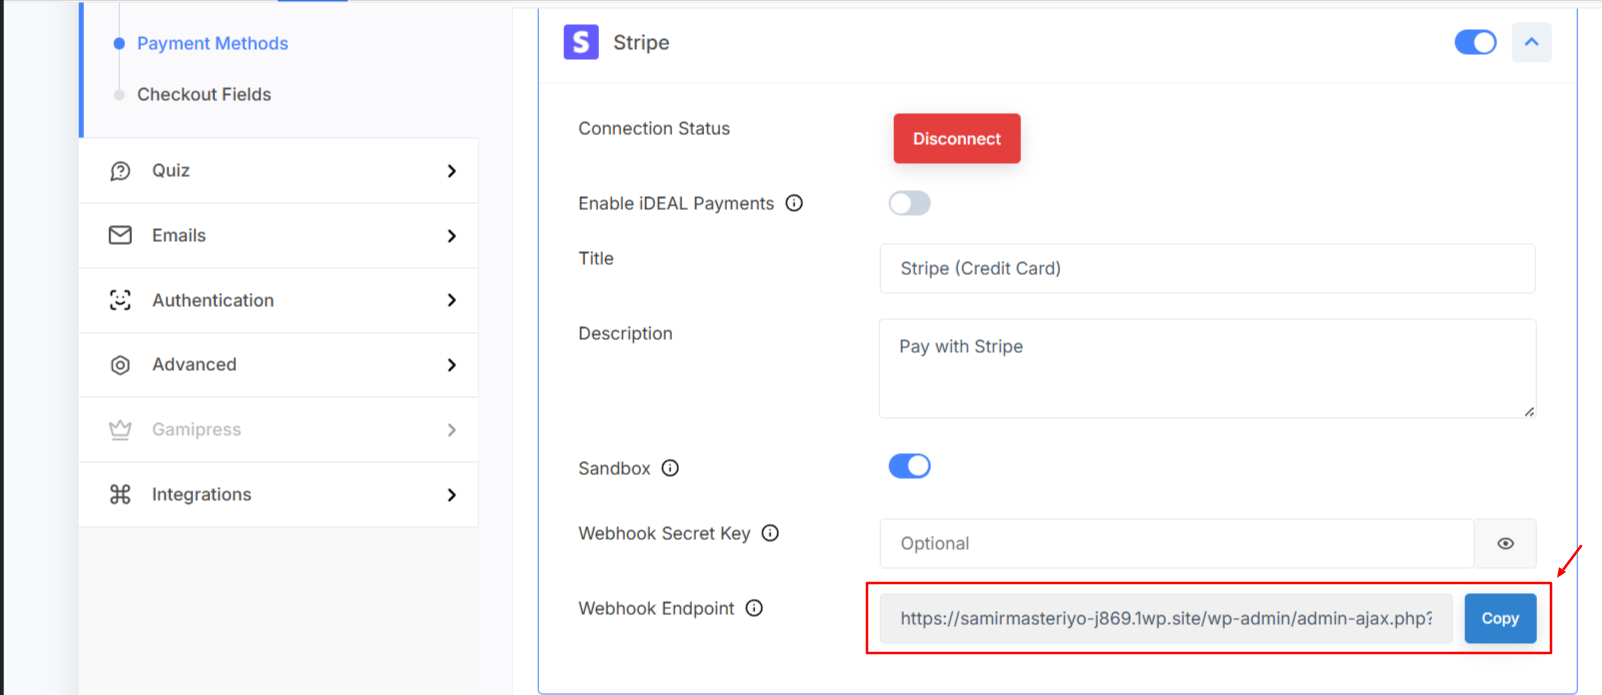
- Connection Status: Shows if your site is currently linked to Stripe.
- Enable iDEAL Payment: Toggle this on if you wish to accept iDEAL payments.
- Title: This is the name of the payment method shown to students at checkout (e.g., "Credit Card").
- Description: This text appears under the title to explain the payment method to the user.
- Sandbox: Enable this mode for testing. It allows you to simulate transactions without using real money. Turn this off for live sales.
- Webhook Endpoint: This is a read-only URL generated by Masteriyo. You must copy this URL and paste it into your Stripe Dashboard under "Add Destination URL" in the webhooks so Stripe knows where to send payment updates.
- Webhook Secret Key (optional): Once you create the endpoint in your Stripe account Dashboard, Stripe will provide a "Signing Secret." Paste that secret here to verify that the payment data received is authentic.
Note: The Webhook Endpoint is the "destination" for Stripe's data, while the Webhook Secret Key is the "password" that proves the data actually came from Stripe.
Setting Up Stripe Webhooks for Automatic Order Completion
To ensure your Masteriyo orders are completed automatically and students get instant access to their courses, you must link a Webhook to your Stripe account. Without this link, the system won't know when a payment is successful, and orders may remain in a "Pending" state.
Before You Start
- Active Stripe Connection: Ensure you have already connected your Stripe account to Masteriyo.
- Site Accessibility: Your website must be public (not behind a maintenance mode or on a local server) so Stripe can send data to it.
Step 1: Copy the Webhook Endpoint from Masteriyo
https://dashboard.stripe.com/webhooks
- Go to Masteriyo > Settings > Payments > Stripe.
- Scroll to the bottom of the page to find the Webhook Endpoint field.
- Copy the entire URL provided in that box.
Step 2: Configure the Webhook in Stripe
- Log in to your Stripe Dashboard.
- Go to the search bar at the top and search for "Webhooks" and click on
create a webhook.
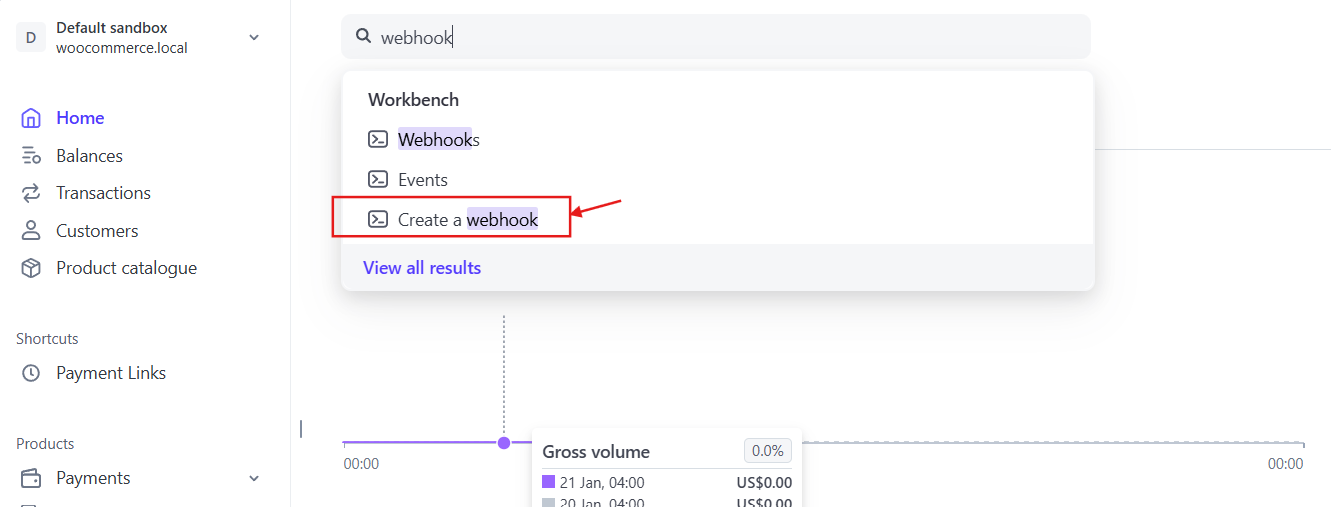
- You will be redirected to the Webhooks Workbench.
- Click on the Add destination button.

- Select Events to Listen to: You must configure the events before adding the
endpoint URL.
- Under the Event from option, select Your account. 
- Search and Select Events: In the search bar that appears, search for and
check all events related to Checkout and Payment Intent.
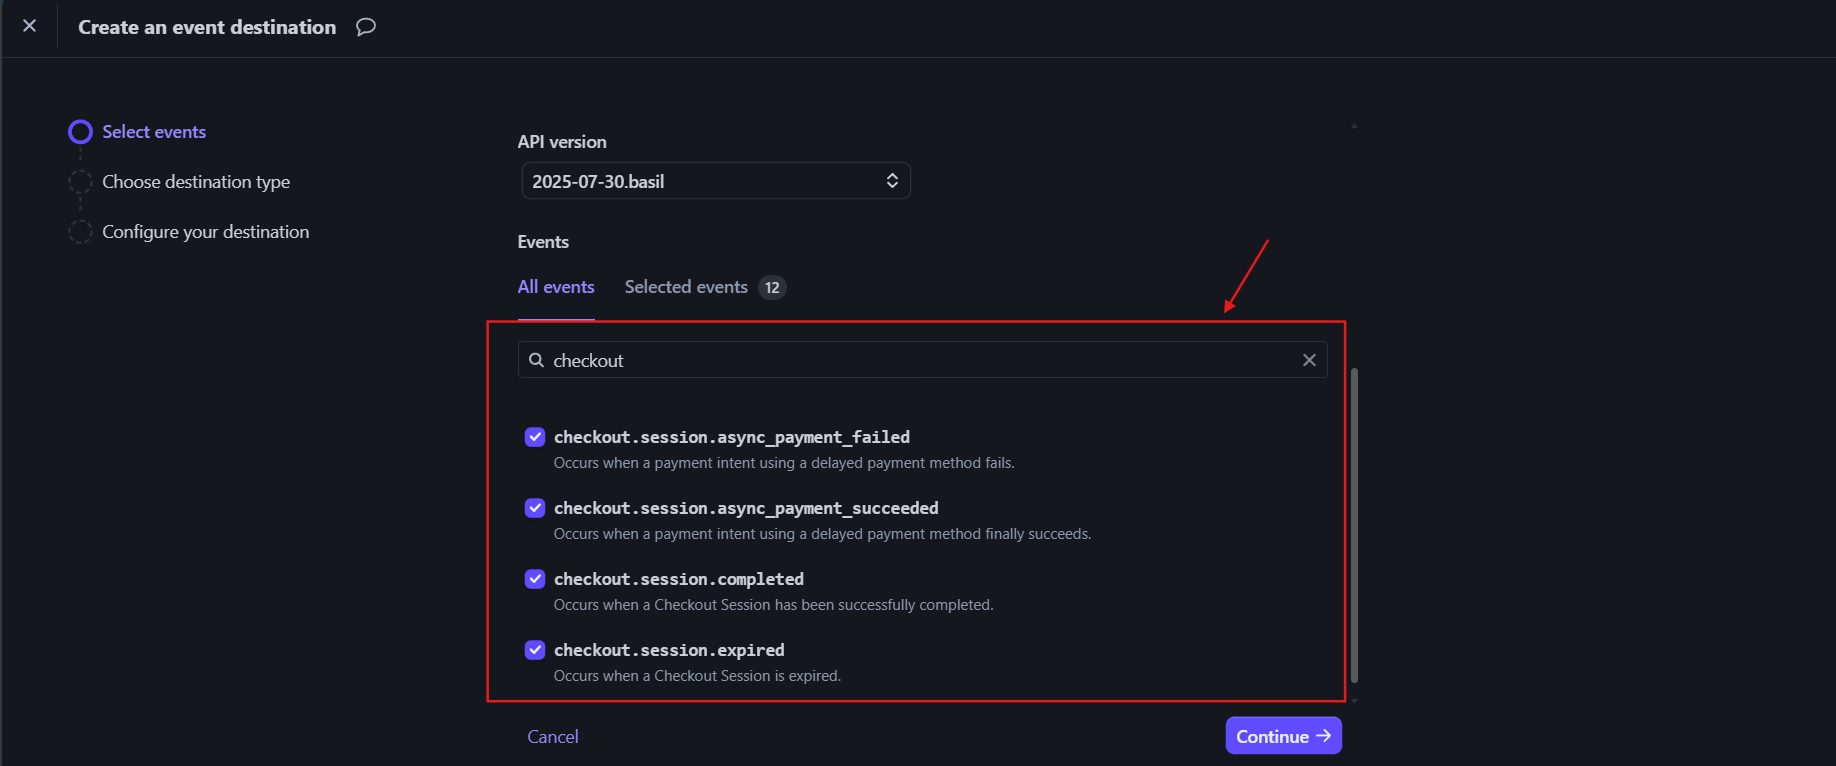
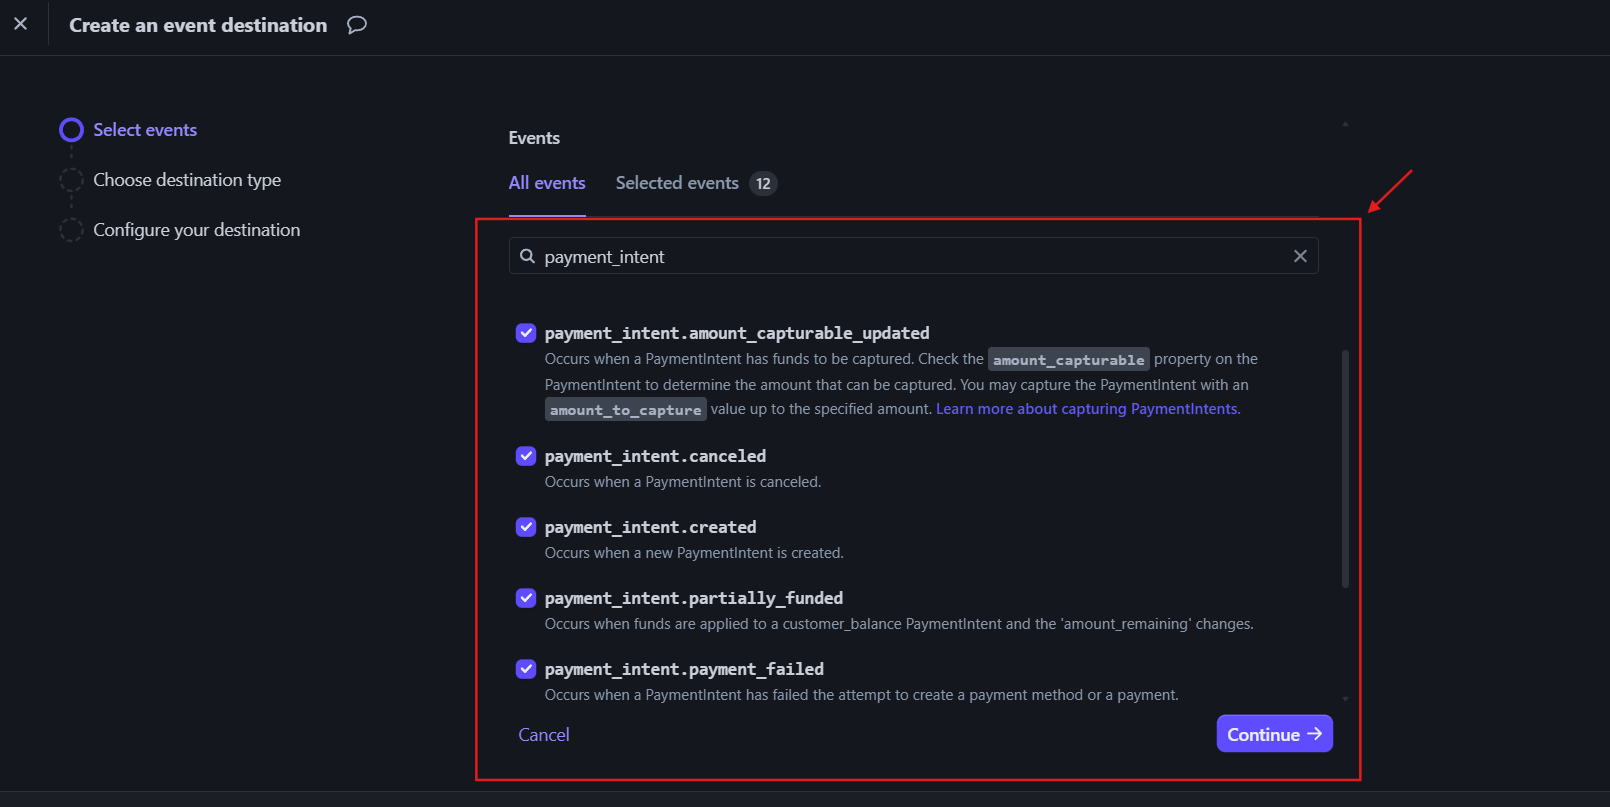
- Click on the continue button at the bottom of the selection list.
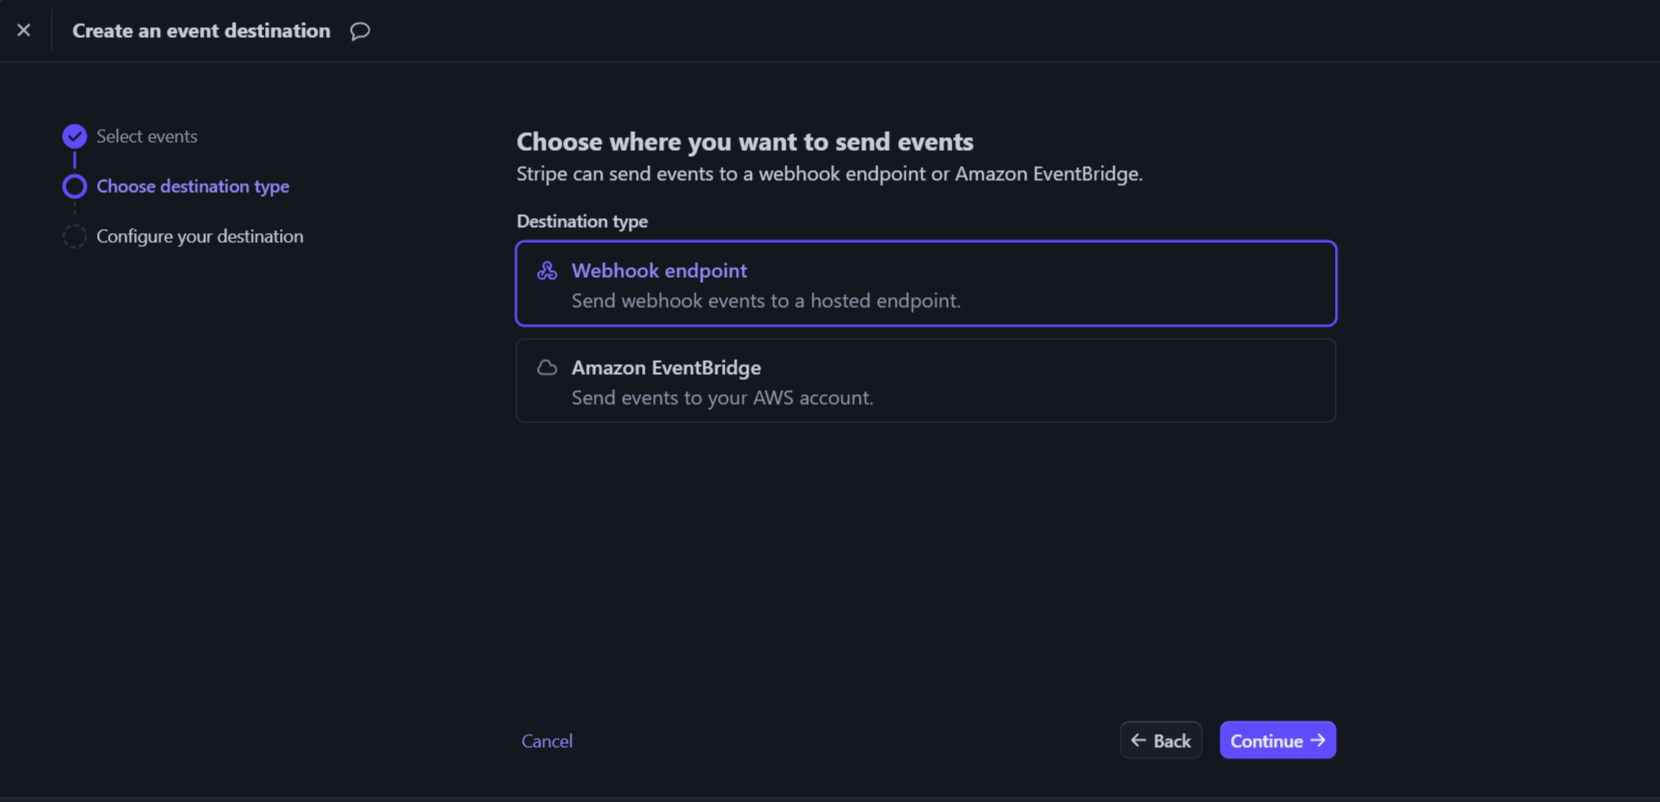
- On the destination type, select webhook endpoint and click on continue.
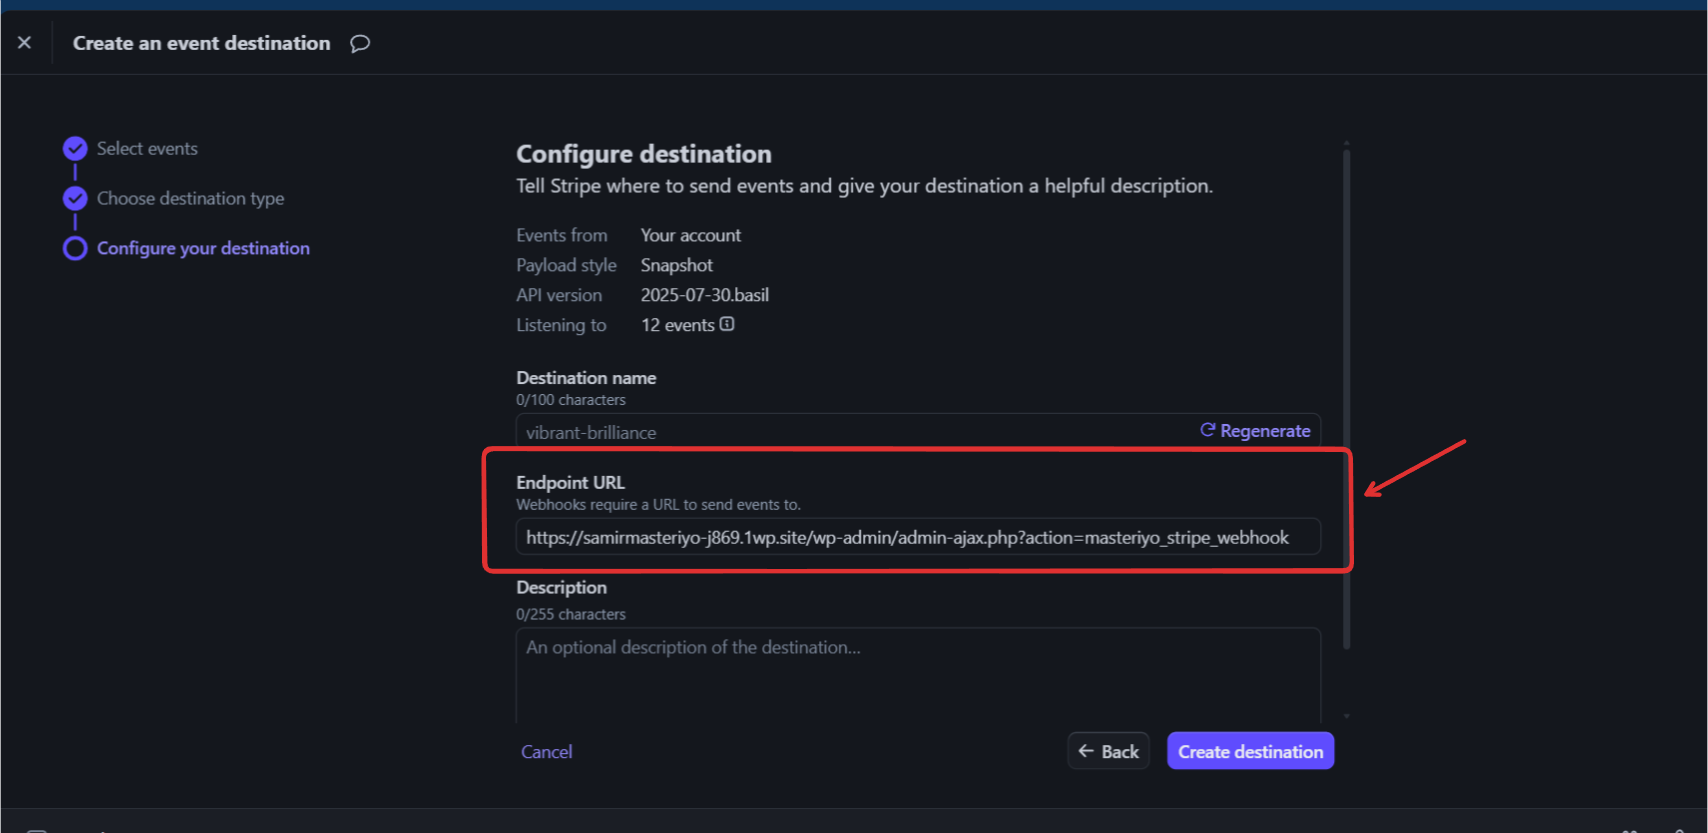
- Now, paste the copied webhook from masteriyo stripe settings to endpoint url
and click on continue.
- The webhook setup is now complete!. Your Masteriyo site and Stripe account are now
officially linked to handle real-time payment updates.
Step 3: Testing Your Setup
- Use Sandbox Mode: Enable the Sandbox option in your Masteriyo Stripe settings to perform a test purchase without using real money.
- Perform a Test Purchase: Log in as a student and purchase a course using one of Stripe’s test card numbers.
- Verify Order Completion: If the setup is correct, the order status should change from "Pending" to "Completed" automatically, and the student should receive immediate access to the course.
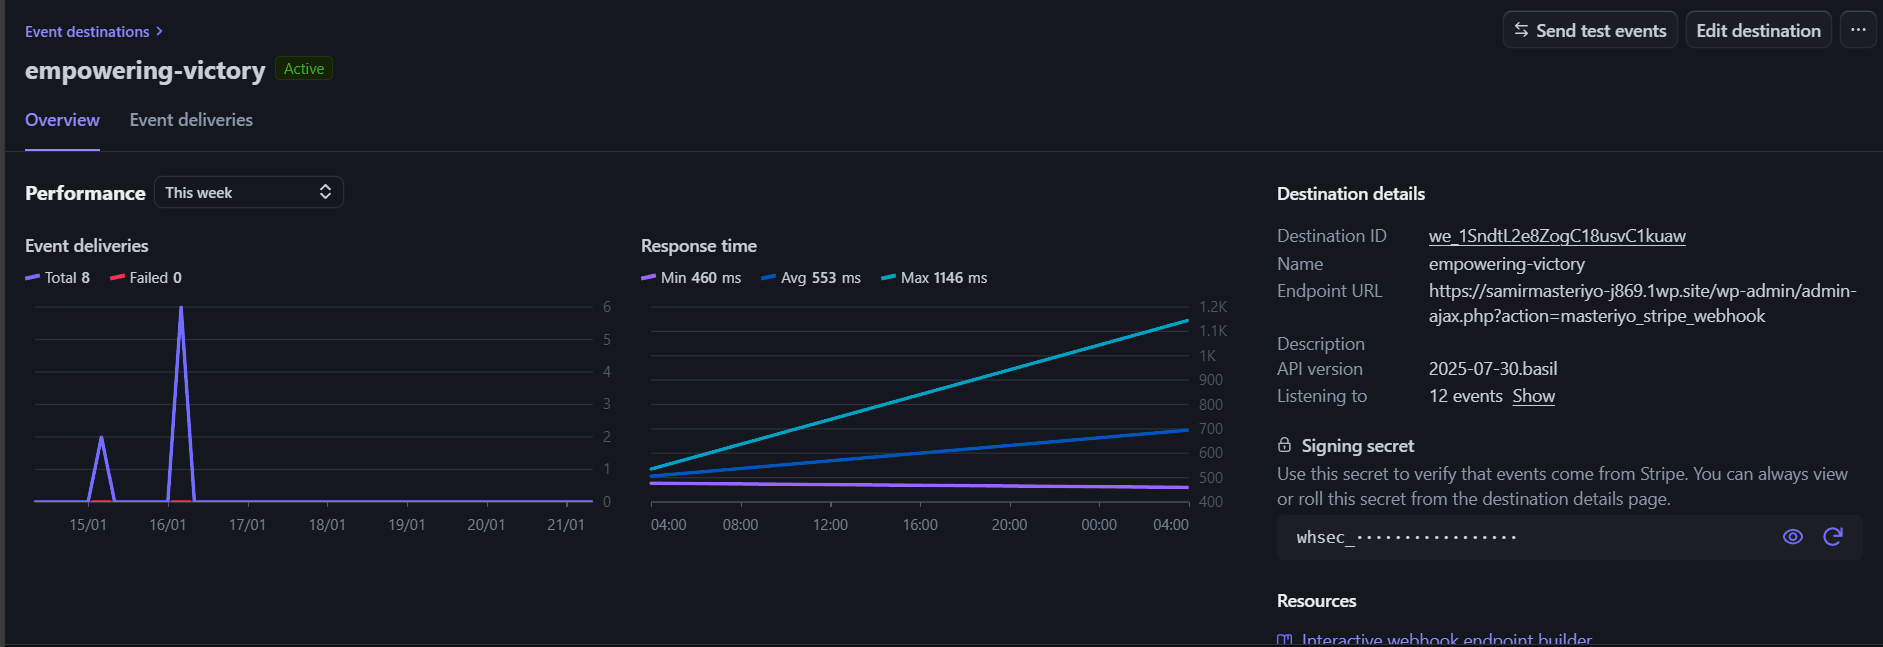
- Check Stripe Logs: If the order doesn't complete, you can check the Event deliveries tab in your Stripe Webhook settings to see if the signals are being sent and if there are any error codes.
Note: Always remember to disable Sandbox mode and ensure you are using your Live Webhook Secret when you are ready to accept real payments from students.
Was this article helpful to you?
Give us Rating
Last edited on May 13, 2026.
Edit this page